<?xml version="1.0" encoding="utf-8"?><feed xmlns="http://www.w3.org/2005/Atom" xml:lang="zh-CN"><generator uri="https://jekyllrb.com/" version="3.10.0">Jekyll</generator><link href="/feed.xml" rel="self" type="application/atom+xml" /><link href="/" rel="alternate" type="text/html" hreflang="zh-CN" /><updated>2026-05-13T16:05:31+00:00</updated><id>/feed.xml</id><title type="html">kyrie-z HOME</title><subtitle>kyrie-z 的文档类记忆站点。</subtitle><entry><title type="html">Systemd 架构分析</title><link href="/linux/kernel/2026/05/13/systemd-architecture.html" rel="alternate" type="text/html" title="Systemd 架构分析" /><published>2026-05-13T14:00:00+00:00</published><updated>2026-05-13T14:00:00+00:00</updated><id>/linux/kernel/2026/05/13/systemd-architecture</id><content type="html" xml:base="/linux/kernel/2026/05/13/systemd-architecture.html"><![CDATA[<p>Systemd 是现代 Linux 系统的核心组件，作为 PID 1 进程负责系统和服务管理。本文从架构角度深入分析其设计原理。</p>

<h2 id="项目概述">项目概述</h2>

<p>Systemd 采用并行启动、依赖管理等技术，显著提高了系统启动速度。主要特性包括：</p>

<ul>
  <li><strong>并行启动</strong>：基于依赖关系的并行化启动</li>
  <li><strong>按需启动</strong>：通过 socket 激活机制实现服务按需启动</li>
  <li><strong>统一日志</strong>：集中式日志管理（journald）</li>
  <li><strong>资源管理</strong>：基于 cgroup 的资源控制和限制</li>
  <li><strong>安全机制</strong>：支持 SELinux、AppArmor、IMA/EVM</li>
</ul>

<h2 id="整体架构">整体架构</h2>

<h3 id="系统层次结构">系统层次结构</h3>

<pre><code class="language-mermaid">graph TB
    subgraph "应用层"
        A1[systemctl]
        A2[journalctl]
        A3[loginctl]
    end

    subgraph "D-Bus通信层"
        D1[System Bus]
        D2[Session Bus]
    end

    subgraph "Systemd Manager PID1"
        M1[Manager]

        subgraph "Unit子系统"
            U1[Service]
            U2[Socket]
            U3[Mount]
            U4[Timer]
            U5[Target]
        end

        subgraph "Job子系统"
            J1[Job Scheduler]
            J2[Transaction]
            J3[Dependency Resolver]
        end

        subgraph "Cgroup子系统"
            C1[Cgroup Controller]
            C2[Resource Control]
        end
    end

    subgraph "辅助服务"
        S1[journald]
        S2[logind]
        S3[networkd]
    end

    subgraph "内核层"
        K1[cgroup]
        K2[netlink]
        K3[inotify]
    end

    A1 --&gt; D1
    D1 --&gt; M1
    M1 --&gt; U1
    M1 --&gt; J1
    M1 --&gt; C1
    C1 --&gt; K1
</code></pre>

<h2 id="核心组件">核心组件</h2>

<h3 id="manager管理器">Manager（管理器）</h3>

<p>Manager 是 systemd 的核心协调器，负责：</p>
<ul>
  <li>管理所有 Unit 的生命周期</li>
  <li>协调 Job 的执行</li>
  <li>处理系统事件和信号</li>
  <li>维护系统状态</li>
</ul>

<p><strong>源码位置</strong>：<code class="language-plaintext highlighter-rouge">src/core/manager.h</code>，<code class="language-plaintext highlighter-rouge">src/core/manager.c</code></p>

<h3 id="unit单元">Unit（单元）</h3>

<p>Unit 是 systemd 中的基本管理对象：</p>

<table>
  <thead>
    <tr>
      <th>类型</th>
      <th>说明</th>
    </tr>
  </thead>
  <tbody>
    <tr>
      <td>Service</td>
      <td>守护进程服务</td>
    </tr>
    <tr>
      <td>Socket</td>
      <td>IPC 通信端点</td>
    </tr>
    <tr>
      <td>Device</td>
      <td>内核设备</td>
    </tr>
    <tr>
      <td>Mount</td>
      <td>文件系统挂载点</td>
    </tr>
    <tr>
      <td>Timer</td>
      <td>定时触发器</td>
    </tr>
    <tr>
      <td>Target</td>
      <td>同步点（类似 runlevel）</td>
    </tr>
    <tr>
      <td>Slice</td>
      <td>资源分配切片</td>
    </tr>
    <tr>
      <td>Scope</td>
      <td>外部创建的进程组</td>
    </tr>
  </tbody>
</table>

<p><strong>源码位置</strong>：<code class="language-plaintext highlighter-rouge">src/core/unit.h</code>，<code class="language-plaintext highlighter-rouge">src/core/unit.c</code></p>

<h3 id="job作业">Job（作业）</h3>

<p>Job 代表对 Unit 执行的操作请求：</p>
<ul>
  <li>START / STOP / RELOAD / RESTART / VERIFY_ACTIVE</li>
</ul>

<p><strong>源码位置</strong>：<code class="language-plaintext highlighter-rouge">src/core/job.h</code>，<code class="language-plaintext highlighter-rouge">src/core/job.c</code></p>

<h3 id="cgroup控制组">Cgroup（控制组）</h3>

<p>Cgroup 子系统负责：</p>
<ul>
  <li>资源限制（CPU、内存、IO）</li>
  <li>进程分组与性能监控</li>
  <li>OOM 管理</li>
</ul>

<h2 id="启动流程交互">启动流程交互</h2>

<pre><code class="language-mermaid">sequenceDiagram
    participant Kernel as Linux内核
    participant Init as systemd(PID1)
    participant JobMgr as Job Manager
    participant Service as Service Unit
    participant Process as 子进程

    Kernel-&gt;&gt;Init: 启动PID1
    Init-&gt;&gt;Init: 初始化Manager
    Init-&gt;&gt;Init: 加载default target

    Init-&gt;&gt;JobMgr: 创建启动事务
    JobMgr-&gt;&gt;JobMgr: 解析依赖关系

    par 并行启动
        JobMgr-&gt;&gt;Service: 创建start job
        Service-&gt;&gt;Process: fork+exec
        Process-&gt;&gt;Service: 发送READY=1
        Service-&gt;&gt;JobMgr: job完成
    end

    JobMgr-&gt;&gt;Init: 启动完成
</code></pre>

<h2 id="源码目录结构">源码目录结构</h2>

<div class="language-plaintext highlighter-rouge"><div class="highlight"><pre class="highlight"><code>systemd/
├── src/
│   ├── core/           # systemd 核心（PID 1）
│   │   ├── manager.c   # 管理器
│   │   ├── unit.c      # 单元抽象
│   │   ├── job.c       # 作业调度
│   │   ├── service.c   # 服务单元
│   │   └── cgroup.c    # 控制组
│   ├── basic/          # 基础工具函数库
│   ├── shared/         # 共享代码
│   └── libsystemd/     # 共享库
│       ├── sd-bus/     # D-Bus 客户端库
│       ├── sd-event/   # 事件循环库
│       ├── sd-journal/ # 日志库
│       └── sd-login/   # 登录会话库
├── units/              # 系统单元文件
└── man/                # 手册页
</code></pre></div></div>

<h2 id="安全模块支持">安全模块支持</h2>

<p>Systemd 深度集成多种 Linux 安全模块：</p>

<h3 id="1-selinux-支持">1. SELinux 支持</h3>

<p><strong>初始化流程</strong>：</p>

<pre><code class="language-mermaid">sequenceDiagram
    participant System as 内核/Initrd
    participant Setup as selinux-setup.c
    participant AVC as SELinux AVC

    System-&gt;&gt;Setup: PID1 启动
    Setup-&gt;&gt;AVC: avc_open()
    Setup-&gt;&gt;Setup: 加载 SELinux 策略
    Setup-&gt;&gt;Setup: 转换到 init 上下文
</code></pre>

<p><strong>单元文件配置</strong>：</p>

<div class="language-ini highlighter-rouge"><div class="highlight"><pre class="highlight"><code><span class="nn">[Service]</span>
<span class="py">SELinuxContext</span><span class="p">=</span><span class="s">system_u:system_r:httpd_t:s0</span>
</code></pre></div></div>

<h3 id="2-apparmor-支持">2. AppArmor 支持</h3>

<div class="language-ini highlighter-rouge"><div class="highlight"><pre class="highlight"><code><span class="nn">[Service]</span>
<span class="py">AppArmorProfile</span><span class="p">=</span><span class="s">/etc/apparmor.d/usr.sbin.nginx</span>
</code></pre></div></div>

<h3 id="3-seccomp-支持">3. Seccomp 支持</h3>

<div class="language-ini highlighter-rouge"><div class="highlight"><pre class="highlight"><code><span class="nn">[Service]</span>
<span class="py">SystemCallFilter</span><span class="p">=</span><span class="s">@system-service</span>
<span class="py">SystemCallErrorNumber</span><span class="p">=</span><span class="s">EPERM</span>
<span class="py">SystemCallArchitectures</span><span class="p">=</span><span class="s">native</span>
</code></pre></div></div>

<h3 id="4-imaevm-支持">4. IMA/EVM 支持</h3>

<p>Systemd 在启动初期加载 IMA 策略：</p>

<div class="language-c highlighter-rouge"><div class="highlight"><pre class="highlight"><code><span class="c1">// src/core/ima-setup.c</span>
<span class="cp">#define IMA_SECFS_POLICY "/sys/kernel/security/ima/policy"
#define IMA_POLICY_PATH  "/etc/ima/ima-policy"
</span></code></pre></div></div>

<h3 id="综合安全配置示例">综合安全配置示例</h3>

<div class="language-ini highlighter-rouge"><div class="highlight"><pre class="highlight"><code><span class="nn">[Service]</span>
<span class="py">User</span><span class="p">=</span><span class="s">nginx</span>
<span class="py">Group</span><span class="p">=</span><span class="s">nginx</span>

<span class="c"># SELinux/AppArmor
</span><span class="py">SELinuxContext</span><span class="p">=</span><span class="s">system_u:system_r:httpd_t:s0</span>

<span class="c"># Seccomp
</span><span class="py">SystemCallFilter</span><span class="p">=</span><span class="s">@system-service</span>
<span class="py">SystemCallErrorNumber</span><span class="p">=</span><span class="s">EPERM</span>

<span class="c"># Capabilities
</span><span class="py">CapabilityBoundingSet</span><span class="p">=</span><span class="s">CAP_NET_BIND_SERVICE</span>
<span class="py">CapabilityBoundingSet</span><span class="p">=</span><span class="s">~CAP_SYS_ADMIN</span>

<span class="c"># 命名空间隔离
</span><span class="py">NoNewPrivileges</span><span class="p">=</span><span class="s">true</span>
<span class="py">PrivateTmp</span><span class="p">=</span><span class="s">true</span>
<span class="py">PrivateDevices</span><span class="p">=</span><span class="s">true</span>
<span class="py">ProtectSystem</span><span class="p">=</span><span class="s">strict</span>
<span class="py">ProtectHome</span><span class="p">=</span><span class="s">yes</span>

<span class="c"># 网络隔离
</span><span class="py">IPAddressAllow</span><span class="p">=</span><span class="s">127.0.0.1/32</span>
<span class="py">IPAddressDeny</span><span class="p">=</span><span class="s">any</span>
</code></pre></div></div>

<h2 id="依赖系统">依赖系统</h2>

<h3 id="依赖类型">依赖类型</h3>

<table>
  <thead>
    <tr>
      <th>依赖类型</th>
      <th>含义</th>
      <th>行为</th>
    </tr>
  </thead>
  <tbody>
    <tr>
      <td><strong>Requires</strong></td>
      <td>强依赖</td>
      <td>目标必须启动成功</td>
    </tr>
    <tr>
      <td><strong>Wants</strong></td>
      <td>弱依赖</td>
      <td>目标失败不影响</td>
    </tr>
    <tr>
      <td><strong>Requisite</strong></td>
      <td>必需且已启动</td>
      <td>目标必须已运行</td>
    </tr>
    <tr>
      <td><strong>BindsTo</strong></td>
      <td>绑定依赖</td>
      <td>目标停止则自身停止</td>
    </tr>
    <tr>
      <td><strong>Conflicts</strong></td>
      <td>冲突</td>
      <td>目标不能同时运行</td>
    </tr>
    <tr>
      <td><strong>Before/After</strong></td>
      <td>启动顺序</td>
      <td>控制启动先后</td>
    </tr>
  </tbody>
</table>

<h2 id="开发指南">开发指南</h2>

<h3 id="编译构建">编译构建</h3>

<p>Systemd 使用 Meson 构建：</p>

<div class="language-bash highlighter-rouge"><div class="highlight"><pre class="highlight"><code><span class="c"># 安装依赖</span>
<span class="nb">sudo </span>apt-get build-dep systemd

<span class="c"># 配置构建</span>
<span class="nb">mkdir </span>build <span class="o">&amp;&amp;</span> <span class="nb">cd </span>build
meson setup .. <span class="nt">-Dmode</span><span class="o">=</span>developer <span class="nt">-Dtests</span><span class="o">=</span><span class="nb">true</span>

<span class="c"># 编译</span>
ninja

<span class="c"># 测试</span>
ninja <span class="nb">test</span>
</code></pre></div></div>

<h3 id="编码规范">编码规范</h3>

<div class="language-c highlighter-rouge"><div class="highlight"><pre class="highlight"><code><span class="c1">// 8 空格缩进</span>
<span class="kt">void</span> <span class="nf">some_function</span><span class="p">(</span><span class="kt">int</span> <span class="n">foo</span><span class="p">,</span> <span class="n">bool</span> <span class="n">bar</span><span class="p">)</span> <span class="p">{</span>
        <span class="kt">int</span> <span class="n">a</span><span class="p">,</span> <span class="n">b</span><span class="p">;</span>

        <span class="c1">// 单行 if 不用花括号</span>
        <span class="k">if</span> <span class="p">(</span><span class="n">foobar</span><span class="p">)</span>
                <span class="n">waldo</span><span class="p">();</span>

        <span class="c1">// 使用 _cleanup_ 自动清理</span>
        <span class="n">_cleanup_free_</span> <span class="kt">char</span> <span class="o">*</span><span class="n">str</span> <span class="o">=</span> <span class="nb">NULL</span><span class="p">;</span>

        <span class="c1">// 错误返回负错误码</span>
        <span class="k">if</span> <span class="p">(</span><span class="n">r</span> <span class="o">&lt;</span> <span class="mi">0</span><span class="p">)</span>
                <span class="k">return</span> <span class="n">log_error_errno</span><span class="p">(</span><span class="n">r</span><span class="p">,</span> <span class="s">"Failed: %m"</span><span class="p">);</span>
<span class="p">}</span>
</code></pre></div></div>

<h3 id="调试技巧">调试技巧</h3>

<div class="language-bash highlighter-rouge"><div class="highlight"><pre class="highlight"><code><span class="c"># 使用 mkosi 构建测试镜像</span>
pip <span class="nb">install </span>mkosi
mkosi genkey
mkosi boot  <span class="c"># systemd-nspawn</span>
mkosi qemu  <span class="c"># QEMU</span>

<span class="c"># 调试用户服务</span>
systemd-analyze verify /path/to/service
</code></pre></div></div>

<h2 id="接口稳定性承诺">接口稳定性承诺</h2>

<p>从版本 26 开始，systemd 承诺以下接口稳定：</p>
<ul>
  <li>单元配置文件格式</li>
  <li>命令行接口（systemctl、journalctl 等）</li>
  <li>D-Bus 接口</li>
  <li>libsystemd 公共 API</li>
</ul>

<h2 id="总结">总结</h2>

<p>Systemd 通过清晰的层次架构实现：</p>

<ol>
  <li><strong>并行化</strong>：依赖图驱动的并行启动</li>
  <li><strong>按需激活</strong>：socket/path/timer 等机制</li>
  <li><strong>统一管理</strong>：Unit 和 Job 抽象</li>
  <li><strong>资源控制</strong>：深度集成 cgroup</li>
  <li><strong>安全集成</strong>：SELinux/AppArmor/seccomp/IMA</li>
</ol>

<p>对于开发者，严格的依赖层级和完善的测试框架确保代码质量；对于系统管理员，统一的接口和强大的资源控制能力提供了灵活的系统管理手段。</p>]]></content><author><name></name></author><category term="linux" /><category term="kernel" /><category term="linux" /><category term="systemd" /><summary type="html"><![CDATA[Systemd 是现代 Linux 系统的核心组件，作为 PID 1 进程负责系统和服务管理。本文从架构角度深入分析其设计原理。]]></summary></entry><entry><title type="html">Linux 音频排查</title><link href="/linux/desktop/2026/05/13/linux-audio-troubleshooting.html" rel="alternate" type="text/html" title="Linux 音频排查" /><published>2026-05-13T13:30:00+00:00</published><updated>2026-05-13T13:30:00+00:00</updated><id>/linux/desktop/2026/05/13/linux-audio-troubleshooting</id><content type="html" xml:base="/linux/desktop/2026/05/13/linux-audio-troubleshooting.html"><![CDATA[<p>Linux 桌面的音频栈从 ALSA → PulseAudio → PipeWire 演进了很多，但偶尔还是会遇到无声、设备识别异常等问题。本文记录了一套系统的排查流程，适用于 PipeWire + WirePlumber 环境。</p>

<h2 id="诊断步骤">诊断步骤</h2>

<h3 id="1-硬件检测">1. 硬件检测</h3>

<div class="language-bash highlighter-rouge"><div class="highlight"><pre class="highlight"><code><span class="c"># 检查 PCI 音频设备</span>
lspci <span class="nt">-v</span> | <span class="nb">grep</span> <span class="nt">-i</span> audio

<span class="c"># 检查 ALSA 播放设备</span>
aplay <span class="nt">-l</span>
</code></pre></div></div>

<h3 id="2-驱动状态检查">2. 驱动状态检查</h3>

<div class="language-bash highlighter-rouge"><div class="highlight"><pre class="highlight"><code><span class="c"># 检查内核驱动</span>
lsmod | <span class="nb">grep </span>snd

<span class="c"># 检查 ALSA 设备列表</span>
aplay <span class="nt">-L</span>
</code></pre></div></div>

<h3 id="3-alsa-状态检查">3. ALSA 状态检查</h3>

<div class="language-bash highlighter-rouge"><div class="highlight"><pre class="highlight"><code><span class="c"># 检查混音器设置</span>
amixer
amixer scontrols

<span class="c"># 检查主音量</span>
amixer get Master
</code></pre></div></div>

<p><strong>关键检查点：</strong></p>
<ul>
  <li>Master 音量是否开启（显示 <code class="language-plaintext highlighter-rouge">[on]</code>）</li>
  <li>音量百分比是否大于 0</li>
  <li>是否有多个输出设备</li>
</ul>

<h3 id="4-pipewire--wireplumber-状态检查">4. PipeWire / WirePlumber 状态检查</h3>

<div class="language-bash highlighter-rouge"><div class="highlight"><pre class="highlight"><code><span class="c"># 检查 PipeWire 服务状态</span>
systemctl <span class="nt">--user</span> status pipewire pipewire-pulse

<span class="c"># 检查 WirePlumber 服务状态</span>
systemctl <span class="nt">--user</span> status wireplumber

<span class="c"># 查看音频节点状态</span>
wpctl status

<span class="c"># 查看详细设备信息</span>
pw-dump | jq <span class="s1">'.[] | select(.info.props."media.class" == "Audio/Sink") | .info.props'</span>
</code></pre></div></div>

<h3 id="5-日志分析">5. 日志分析</h3>

<div class="language-bash highlighter-rouge"><div class="highlight"><pre class="highlight"><code><span class="c"># WirePlumber 日志</span>
journalctl <span class="nt">--user</span> <span class="nt">-u</span> wireplumber <span class="nt">--since</span> <span class="s2">"1 hour ago"</span> | <span class="nb">tail</span> <span class="nt">-50</span>

<span class="c"># 内核音频消息</span>
dmesg | <span class="nb">grep</span> <span class="nt">-i</span> <span class="s2">"audio</span><span class="se">\|</span><span class="s2">sound</span><span class="se">\|</span><span class="s2">snd</span><span class="se">\|</span><span class="s2">sof</span><span class="se">\|</span><span class="s2">alc"</span> | <span class="nb">tail</span> <span class="nt">-30</span>
</code></pre></div></div>

<h2 id="常见问题模式">常见问题模式</h2>

<h3 id="模式1虚拟输出而非硬件输出">模式1：虚拟输出而非硬件输出</h3>

<p><strong>症状：</strong> <code class="language-plaintext highlighter-rouge">wpctl status</code> 显示默认输出为”虚拟输出”</p>

<div class="language-bash highlighter-rouge"><div class="highlight"><pre class="highlight"><code>Audio
 ├─ Sinks:
 │  <span class="k">*</span>   35. 虚拟输出    <span class="o">[</span>vol: 0.71]
</code></pre></div></div>

<p><strong>原因：</strong> WirePlumber 未能成功创建硬件音频节点。</p>

<h3 id="模式2wireplumber-节点创建失败">模式2：WirePlumber 节点创建失败</h3>

<p><strong>日志示例：</strong></p>

<div class="language-plaintext highlighter-rouge"><div class="highlight"><pre class="highlight"><code>s-monitors: Failed to create alsa_output.pci-0000_00_1f.3-platform-skl_hda_dsp_generic.HiFi__Speaker__sink: Object activation aborted: PipeWire proxy destroyed
</code></pre></div></div>

<p><strong>可能原因：</strong></p>
<ul>
  <li>WirePlumber 配置问题</li>
  <li>PipeWire 与 ALSA 通信故障</li>
  <li>权限不足</li>
  <li>内核驱动问题</li>
</ul>

<h3 id="模式3设备静音或音量过低">模式3：设备静音或音量过低</h3>

<div class="language-bash highlighter-rouge"><div class="highlight"><pre class="highlight"><code>wpctl get-volume @DEFAULT_AUDIO_SINK@
wpctl inspect &lt;device_id&gt; | <span class="nb">grep</span> <span class="nt">-i</span> mute
</code></pre></div></div>

<h3 id="模式4默认输出设备错误">模式4：默认输出设备错误</h3>

<div class="language-bash highlighter-rouge"><div class="highlight"><pre class="highlight"><code>wpctl status
<span class="c"># 确认默认输出是否为硬件设备</span>
</code></pre></div></div>

<h2 id="解决方案">解决方案</h2>

<h3 id="方案1重启音频服务">方案1：重启音频服务</h3>

<div class="language-bash highlighter-rouge"><div class="highlight"><pre class="highlight"><code><span class="c"># 重启 WirePlumber（最常用）</span>
systemctl <span class="nt">--user</span> restart wireplumber

<span class="c"># 重启整个 PipeWire 栈</span>
systemctl <span class="nt">--user</span> restart pipewire pipewire-pulse wireplumber

<span class="c"># 等待后检查</span>
<span class="nb">sleep </span>3 <span class="o">&amp;&amp;</span> wpctl status
</code></pre></div></div>

<h3 id="方案2设置正确的默认输出">方案2：设置正确的默认输出</h3>

<div class="language-bash highlighter-rouge"><div class="highlight"><pre class="highlight"><code><span class="c"># 列出所有音频输出</span>
wpctl status | <span class="nb">grep</span> <span class="nt">-A5</span> <span class="s2">"Sinks:"</span>

<span class="c"># 设置硬件设备为默认输出</span>
wpctl set-default &lt;device_id&gt;

<span class="c"># 取消静音</span>
wpctl set-mute &lt;device_id&gt; 0

<span class="c"># 调整音量（0.0-1.0）</span>
wpctl set-volume &lt;device_id&gt; 0.8
</code></pre></div></div>

<h3 id="方案3直接测试-alsa-输出">方案3：直接测试 ALSA 输出</h3>

<div class="language-bash highlighter-rouge"><div class="highlight"><pre class="highlight"><code><span class="c"># 绕过 PipeWire 直接测试硬件</span>
speaker-test <span class="nt">-D</span> hw:0,0 <span class="nt">-c</span> 2 <span class="nt">-t</span> sine <span class="nt">-f</span> 440
</code></pre></div></div>

<h3 id="方案4检查权限和组">方案4：检查权限和组</h3>

<div class="language-bash highlighter-rouge"><div class="highlight"><pre class="highlight"><code><span class="nb">groups</span> | <span class="nb">grep </span>audio
<span class="nb">ls</span> <span class="nt">-la</span> /dev/snd/
<span class="nb">sudo </span>usermod <span class="nt">-aG</span> audio <span class="nv">$USER</span>
</code></pre></div></div>

<h2 id="深度分析开机无声问题">深度分析：开机无声问题</h2>

<h3 id="问题现象">问题现象</h3>

<p>每次开机后无声音，需手动重启 WirePlumber 才能恢复。</p>

<h3 id="关键日志证据">关键日志证据</h3>

<ol>
  <li><strong>WirePlumber 启动失败</strong>：
    <div class="language-plaintext highlighter-rouge"><div class="highlight"><pre class="highlight"><code>s-monitors: Failed to create alsa_output...: Object activation aborted: PipeWire proxy destroyed
</code></pre></div>    </div>
  </li>
  <li><strong>PipeWire 设备忙错误</strong>：
    <div class="language-plaintext highlighter-rouge"><div class="highlight"><pre class="highlight"><code>spa.alsa: '_ucm0001.hw:sofhdadsp,5': playback open failed: 设备或资源忙
</code></pre></div>    </div>
  </li>
</ol>

<h3 id="根本原因">根本原因</h3>

<p><strong>ALSA 设备初始化与 PipeWire 服务启动的时序竞争：</strong></p>

<ol>
  <li>开机序列：内核加载驱动 → <code class="language-plaintext highlighter-rouge">alsa-restore.service</code> 恢复状态 → 用户会话启动 PipeWire/WirePlumber</li>
  <li>竞争窗口：WirePlumber 启动时，ALSA 设备可能仍在固件加载或被 <code class="language-plaintext highlighter-rouge">alsa-restore</code> 短暂占用</li>
  <li>失败后果：PipeWire 首次打开设备失败 → WirePlumber 销毁设备对象 → 系统回退到虚拟输出</li>
</ol>

<p><strong>重启 WirePlumber 有效的原理</strong>：重启时 ALSA 设备已完全就绪，无竞争条件。</p>

<h3 id="验证方法">验证方法</h3>

<div class="language-bash highlighter-rouge"><div class="highlight"><pre class="highlight"><code><span class="c"># 查看完整启动时间线</span>
journalctl <span class="nt">-b</span> <span class="nt">--user-unit</span><span class="o">=</span>pipewire <span class="nt">--user-unit</span><span class="o">=</span>wireplumber

<span class="c"># 检查系统服务时序</span>
systemd-analyze plot <span class="o">&gt;</span> boot-timeline.svg

<span class="c"># 查看内核音频初始化</span>
dmesg | <span class="nb">grep</span> <span class="nt">-E</span> <span class="s2">"(sof|snd|audio|hda)"</span> | <span class="nb">head</span> <span class="nt">-30</span>
</code></pre></div></div>

<h2 id="命令速查表">命令速查表</h2>

<table>
  <thead>
    <tr>
      <th>命令</th>
      <th>用途</th>
      <th>示例</th>
    </tr>
  </thead>
  <tbody>
    <tr>
      <td><code class="language-plaintext highlighter-rouge">wpctl status</code></td>
      <td>查看音频节点</td>
      <td><code class="language-plaintext highlighter-rouge">wpctl status</code></td>
    </tr>
    <tr>
      <td><code class="language-plaintext highlighter-rouge">wpctl set-default</code></td>
      <td>设置默认输出</td>
      <td><code class="language-plaintext highlighter-rouge">wpctl set-default 51</code></td>
    </tr>
    <tr>
      <td><code class="language-plaintext highlighter-rouge">wpctl set-volume</code></td>
      <td>调整音量</td>
      <td><code class="language-plaintext highlighter-rouge">wpctl set-volume @DEFAULT_AUDIO_SINK@ 0.8</code></td>
    </tr>
    <tr>
      <td><code class="language-plaintext highlighter-rouge">wpctl set-mute</code></td>
      <td>静音/取消</td>
      <td><code class="language-plaintext highlighter-rouge">wpctl set-mute 51 0</code></td>
    </tr>
    <tr>
      <td><code class="language-plaintext highlighter-rouge">amixer</code></td>
      <td>ALSA 混音器</td>
      <td><code class="language-plaintext highlighter-rouge">amixer sset Master 80%</code></td>
    </tr>
    <tr>
      <td><code class="language-plaintext highlighter-rouge">aplay -l</code></td>
      <td>列出播放设备</td>
      <td><code class="language-plaintext highlighter-rouge">aplay -l</code></td>
    </tr>
    <tr>
      <td><code class="language-plaintext highlighter-rouge">pw-cli</code></td>
      <td>PipeWire CLI</td>
      <td><code class="language-plaintext highlighter-rouge">pw-cli list-objects</code></td>
    </tr>
    <tr>
      <td><code class="language-plaintext highlighter-rouge">systemctl --user</code></td>
      <td>用户服务管理</td>
      <td><code class="language-plaintext highlighter-rouge">systemctl --user restart wireplumber</code></td>
    </tr>
  </tbody>
</table>

<h2 id="排查流程图">排查流程图</h2>

<div class="language-plaintext highlighter-rouge"><div class="highlight"><pre class="highlight"><code>无声音
 ├─ 1. 检查硬件 → lspci / aplay -l
 ├─ 2. 检查驱动 → lsmod / dmesg
 ├─ 3. 检查 ALSA → amixer / speaker-test
 ├─ 4. 检查 PipeWire → systemctl / wpctl / 日志
 └─ 5. 执行修复
     ├─ 重启 WirePlumber
     ├─ 设置默认设备
     ├─ 调整音量/取消静音
     └─ 检查权限
</code></pre></div></div>

<h2 id="参考资料">参考资料</h2>

<ul>
  <li><a href="https://www.alsa-project.org/">ALSA 文档</a></li>
  <li><a href="https://pipewire.org/">PipeWire 文档</a></li>
  <li><a href="https://pipewire.pages.freedesktop.org/wireplumber/">WirePlumber 文档</a></li>
  <li><a href="https://wiki.archlinux.org/title/PipeWire">Arch Linux Wiki - PipeWire</a></li>
</ul>]]></content><author><name></name></author><category term="linux" /><category term="desktop" /><category term="linux" /><category term="security" /><category term="pipewire" /><category term="audio" /><summary type="html"><![CDATA[Linux 桌面的音频栈从 ALSA → PulseAudio → PipeWire 演进了很多，但偶尔还是会遇到无声、设备识别异常等问题。本文记录了一套系统的排查流程，适用于 PipeWire + WirePlumber 环境。]]></summary></entry><entry><title type="html">SELinux 工具速查手册</title><link href="/linux/security/2026/05/13/selinux-command-cheatsheet.html" rel="alternate" type="text/html" title="SELinux 工具速查手册" /><published>2026-05-13T13:00:00+00:00</published><updated>2026-05-13T13:00:00+00:00</updated><id>/linux/security/2026/05/13/selinux-command-cheatsheet</id><content type="html" xml:base="/linux/security/2026/05/13/selinux-command-cheatsheet.html"><![CDATA[<p>SELinux（Security-Enhanced Linux）是 Linux 上最主流的强制访问控制（MAC）机制，但相关命令繁多，经常需要翻文档。这里整理了一份速查表，覆盖日常运维和策略开发中最常用的命令。</p>

<h2 id="状态管理">状态管理</h2>

<table>
  <thead>
    <tr>
      <th>命令</th>
      <th>作用</th>
      <th>用法示例</th>
      <th>备注</th>
    </tr>
  </thead>
  <tbody>
    <tr>
      <td><code class="language-plaintext highlighter-rouge">getenforce</code></td>
      <td>查看当前模式</td>
      <td><code class="language-plaintext highlighter-rouge">getenforce</code></td>
      <td>输出 <code class="language-plaintext highlighter-rouge">Enforcing</code>、<code class="language-plaintext highlighter-rouge">Permissive</code> 或 <code class="language-plaintext highlighter-rouge">Disabled</code></td>
    </tr>
    <tr>
      <td><code class="language-plaintext highlighter-rouge">setenforce</code></td>
      <td>临时切换模式</td>
      <td><code class="language-plaintext highlighter-rouge">setenforce 0</code>（宽松）/ <code class="language-plaintext highlighter-rouge">setenforce 1</code>（强制）</td>
      <td>重启后失效</td>
    </tr>
    <tr>
      <td><code class="language-plaintext highlighter-rouge">sestatus</code></td>
      <td>显示详细状态</td>
      <td><code class="language-plaintext highlighter-rouge">sestatus</code></td>
      <td>包括策略、模式、文件系统状态等</td>
    </tr>
  </tbody>
</table>

<h2 id="安全上下文">安全上下文</h2>

<table>
  <thead>
    <tr>
      <th>命令</th>
      <th>作用</th>
      <th>用法示例</th>
      <th>备注</th>
    </tr>
  </thead>
  <tbody>
    <tr>
      <td><code class="language-plaintext highlighter-rouge">ls -Z</code></td>
      <td>查看文件安全上下文</td>
      <td><code class="language-plaintext highlighter-rouge">ls -Z /var/www/html</code></td>
      <td><code class="language-plaintext highlighter-rouge">-Z</code> 显示 SELinux 上下文</td>
    </tr>
    <tr>
      <td><code class="language-plaintext highlighter-rouge">ps -efZ</code></td>
      <td>查看进程安全上下文</td>
      <td><code class="language-plaintext highlighter-rouge">ps -efZ \| grep httpd</code></td>
      <td> </td>
    </tr>
    <tr>
      <td><code class="language-plaintext highlighter-rouge">chcon</code></td>
      <td>临时修改上下文</td>
      <td><code class="language-plaintext highlighter-rouge">chcon -t httpd_sys_content_t /file</code></td>
      <td>下次重新打标签后失效</td>
    </tr>
    <tr>
      <td><code class="language-plaintext highlighter-rouge">semanage fcontext</code></td>
      <td>永久定义上下文规则</td>
      <td><code class="language-plaintext highlighter-rouge">semanage fcontext -a -t httpd_t "/var/www(/.*)?"</code></td>
      <td>需配合 <code class="language-plaintext highlighter-rouge">restorecon</code></td>
    </tr>
    <tr>
      <td><code class="language-plaintext highlighter-rouge">restorecon</code></td>
      <td>恢复默认上下文</td>
      <td><code class="language-plaintext highlighter-rouge">restorecon -Rv /var/www/</code></td>
      <td><code class="language-plaintext highlighter-rouge">-R</code> 递归，<code class="language-plaintext highlighter-rouge">-v</code> 显示详情</td>
    </tr>
  </tbody>
</table>

<h2 id="布尔值管理">布尔值管理</h2>

<table>
  <thead>
    <tr>
      <th>命令</th>
      <th>作用</th>
      <th>用法示例</th>
      <th>备注</th>
    </tr>
  </thead>
  <tbody>
    <tr>
      <td><code class="language-plaintext highlighter-rouge">getsebool</code></td>
      <td>查看布尔值状态</td>
      <td><code class="language-plaintext highlighter-rouge">getsebool httpd_can_network_connect</code></td>
      <td>检查策略开关</td>
    </tr>
    <tr>
      <td><code class="language-plaintext highlighter-rouge">setsebool</code></td>
      <td>修改布尔值</td>
      <td><code class="language-plaintext highlighter-rouge">setsebool -P httpd_can_network_connect on</code></td>
      <td><code class="language-plaintext highlighter-rouge">-P</code> 永久生效</td>
    </tr>
  </tbody>
</table>

<h2 id="故障排除">故障排除</h2>

<table>
  <thead>
    <tr>
      <th>命令</th>
      <th>作用</th>
      <th>用法示例</th>
      <th>备注</th>
    </tr>
  </thead>
  <tbody>
    <tr>
      <td><code class="language-plaintext highlighter-rouge">audit2allow</code></td>
      <td>根据审计日志生成策略</td>
      <td><code class="language-plaintext highlighter-rouge">cat /var/log/audit/audit.log \| audit2allow</code></td>
      <td>将拒绝行为转为允许规则</td>
    </tr>
    <tr>
      <td><code class="language-plaintext highlighter-rouge">ausearch</code></td>
      <td>搜索审计日志</td>
      <td><code class="language-plaintext highlighter-rouge">ausearch -c 'httpd' -m 'AVC'</code></td>
      <td>常与 <code class="language-plaintext highlighter-rouge">audit2allow</code> 配合</td>
    </tr>
  </tbody>
</table>

<h2 id="端口管理">端口管理</h2>

<table>
  <thead>
    <tr>
      <th>命令</th>
      <th>作用</th>
      <th>用法示例</th>
    </tr>
  </thead>
  <tbody>
    <tr>
      <td><code class="language-plaintext highlighter-rouge">semanage port</code></td>
      <td>管理端口安全上下文</td>
      <td><code class="language-plaintext highlighter-rouge">semanage port -a -t http_port_t -p tcp 8080</code></td>
    </tr>
  </tbody>
</table>

<h2 id="用户映射">用户映射</h2>

<table>
  <thead>
    <tr>
      <th>命令</th>
      <th>作用</th>
      <th>用法示例</th>
    </tr>
  </thead>
  <tbody>
    <tr>
      <td><code class="language-plaintext highlighter-rouge">semanage login</code></td>
      <td>管理 Linux 用户与 SELinux 用户映射</td>
      <td><code class="language-plaintext highlighter-rouge">semanage login -a -s staff_u myuser</code></td>
    </tr>
  </tbody>
</table>

<h2 id="策略开发">策略开发</h2>

<table>
  <thead>
    <tr>
      <th>命令</th>
      <th>作用</th>
      <th>用法示例</th>
      <th>备注</th>
    </tr>
  </thead>
  <tbody>
    <tr>
      <td><code class="language-plaintext highlighter-rouge">checkmodule</code></td>
      <td>编译策略源码</td>
      <td><code class="language-plaintext highlighter-rouge">checkmodule -M -m -o mymodule.mod mymodule.te</code></td>
      <td><code class="language-plaintext highlighter-rouge">.te</code> → <code class="language-plaintext highlighter-rouge">.mod</code></td>
    </tr>
    <tr>
      <td><code class="language-plaintext highlighter-rouge">semodule_package</code></td>
      <td>打包策略模块</td>
      <td><code class="language-plaintext highlighter-rouge">semodule_package -o mymodule.pp -m mymodule.mod</code></td>
      <td><code class="language-plaintext highlighter-rouge">.mod</code> → <code class="language-plaintext highlighter-rouge">.pp</code></td>
    </tr>
    <tr>
      <td><code class="language-plaintext highlighter-rouge">semodule</code></td>
      <td>加载/卸载策略模块</td>
      <td><code class="language-plaintext highlighter-rouge">semodule -i mymodule.pp</code>（安装）/ <code class="language-plaintext highlighter-rouge">semodule -r mymodule</code>（移除）</td>
      <td> </td>
    </tr>
    <tr>
      <td><code class="language-plaintext highlighter-rouge">seinfo</code></td>
      <td>查询策略信息</td>
      <td><code class="language-plaintext highlighter-rouge">seinfo -t</code>（查类型）/ <code class="language-plaintext highlighter-rouge">seinfo -t httpd_t</code>（查特定类型）</td>
      <td>调试利器</td>
    </tr>
    <tr>
      <td><code class="language-plaintext highlighter-rouge">sesearch</code></td>
      <td>查询策略规则</td>
      <td><code class="language-plaintext highlighter-rouge">sesearch -A -s httpd_t -t httpd_sys_content_t -c file</code></td>
      <td>查看特定访问权限</td>
    </tr>
  </tbody>
</table>

<hr />

<blockquote>
  <p>💡 <strong>小贴士</strong>：开发自定义策略时，典型流程是 <code class="language-plaintext highlighter-rouge">checkmodule</code> → <code class="language-plaintext highlighter-rouge">semodule_package</code> → <code class="language-plaintext highlighter-rouge">semodule -i</code>。排障时先看 <code class="language-plaintext highlighter-rouge">audit2allow</code> 的输出，理解拒绝原因后再决定是写策略还是调布尔值。</p>
</blockquote>]]></content><author><name></name></author><category term="linux" /><category term="security" /><category term="linux" /><category term="selinux" /><summary type="html"><![CDATA[SELinux（Security-Enhanced Linux）是 Linux 上最主流的强制访问控制（MAC）机制，但相关命令繁多，经常需要翻文档。这里整理了一份速查表，覆盖日常运维和策略开发中最常用的命令。]]></summary></entry><entry><title type="html">LLM 缓存与 TTL</title><link href="/ai/llm/2026/05/11/llm-context-cache-ttl.html" rel="alternate" type="text/html" title="LLM 缓存与 TTL" /><published>2026-05-11T13:15:00+00:00</published><updated>2026-05-11T13:15:00+00:00</updated><id>/ai/llm/2026/05/11/llm-context-cache-ttl</id><content type="html" xml:base="/ai/llm/2026/05/11/llm-context-cache-ttl.html"><![CDATA[<h2 id="1-引言为什么我们要聊上下文缓存">1. 引言：为什么我们要聊”上下文缓存”？</h2>

<p>在使用 <strong>Claude Code</strong> 或进行长对话开发时，你可能发现费用增长得远超预期。这是因为 Claude Code 与 LLM 的交互并不是简单的”你问我答”。</p>

<h3 id="11-claude-code-的后台潜规则">1.1 Claude Code 的后台”潜规则”</h3>
<p>Claude Code 作为一个 Agent，它在后台与 LLM 交互时会携带巨大的<strong>工程负担（Harness Engineering）</strong>：</p>
<ul>
  <li><strong>庞大的系统提示词</strong>：包含了复杂的角色设定、工具使用说明。</li>
  <li><strong>动态注入的 Reminders</strong>：如 TODO 列表、文件编辑约束等。</li>
  <li><strong>完整的内容上下文</strong>：代码库片段、历史对话等。</li>
</ul>

<p>这些”后台内容”往往占据了请求 Token 的 <strong>90% 以上</strong>。在无状态的 API 设计下，每一轮对话你都在为这些重复的”后台内容”买单。如果不使用缓存，费用会随着对话轮数呈线性甚至指数级上升。</p>

<p><strong>具体解释：</strong></p>
<ol>
  <li><strong>上下文缓存</strong>：指把经常重复使用的”长文本”（如几十页的系统指令、背景资料）预先存到缓存里。下次请求时直接调用，<strong>无需重复上传</strong>，能大幅降低延迟和费用。</li>
  <li><strong>TTL</strong>：指设定这段缓存的<strong>自动过期时间</strong>（比如5-10分钟）。一旦超出设定时间，缓存就会被清理，下次请求会重新计算。</li>
</ol>

<p><strong>用一个”图书馆”的比喻帮你理解：</strong></p>
<ul>
  <li><strong>上下文缓存</strong>：你第一次从书库找一本书（消耗算力），然后把它放在自己座位上。</li>
  <li><strong>后续查询</strong>：所有类似问题都直接从座位上翻书，秒回且便宜。</li>
  <li><strong>TTL</strong>：图书馆规定座位保留1小时（TTL=3600秒）。时间一到，座位清空，书归还书库。这是为了确保数据实时性，并防止缓存无限占用资源。</li>
</ul>

<hr />

<h2 id="2-旁观者视角使用-claude-tap-观察交互过程">2. 旁观者视角：使用 <code class="language-plaintext highlighter-rouge">claude-tap</code> 观察交互过程</h2>

<p>在深入技术原理之前，我们先通过工具看看 Claude Code 到底在后台跟 LLM 说了什么。</p>

<p><code class="language-plaintext highlighter-rouge">claude-tap</code> 是一个专门设计用来拦截、查看并分析 AI 命令行工具（如 Claude Code 和 Codex CLI）底层 API 流量的抓包与分析工具。当运行 <code class="language-plaintext highlighter-rouge">claude-tap</code> 时，它会在本地启动一个 HTTP 服务。它通过环境变量（如 <code class="language-plaintext highlighter-rouge">ANTHROPIC_BASE_URL</code> 或 <code class="language-plaintext highlighter-rouge">OPENAI_BASE_URL</code>）将后端的 AI 客户端（如 Claude Code）原本要发往官方服务器的流量，强行”劫持”/重定向到本地的这个代理端口。随后，代理服务器再将请求转发给真正的上游官方 API（如 <code class="language-plaintext highlighter-rouge">api.anthropic.com</code>）。在这个过程中，<code class="language-plaintext highlighter-rouge">claude-tap</code> 可以无缝地捕获所有经过的 Request 和 Response，并记录流式数据（SSE）。</p>

<p><strong>claude-tap github地址</strong>：<a href="https://github.com/liaohch3/claude-tap">https://github.com/liaohch3/claude-tap</a></p>

<h3 id="21-trace">2.1 Trace!</h3>
<p>直接看文档往往是枯燥的。通过 <code class="language-plaintext highlighter-rouge">claude-tap</code>，你可以实时抓取并解剖真实的 API 报文，看到那些被 CLI 隐藏起来的秘密。</p>

<ul>
  <li><strong>运行claude-tap命令</strong>：
    <ol>
      <li><code class="language-plaintext highlighter-rouge">claude-tap --tap-live --tap-target https://ai.uniontech.com/api/v1 --tap-no-launch --tap-host 127.0.0.1 --tap-port 8080</code></li>
    </ol>
  </li>
  <li><strong>启动claude</strong>:
    <ol>
      <li>将<code class="language-plaintext highlighter-rouge">~/.claude/settings.json</code>中<code class="language-plaintext highlighter-rouge">ANTHROPIC_BASE_URL</code>改为 <code class="language-plaintext highlighter-rouge">http://127.0.0.1:8080</code></li>
      <li>执行 <code class="language-plaintext highlighter-rouge">claude</code></li>
    </ol>
  </li>
</ul>

<h3 id="22-你会发现什么">2.2 你会发现什么？</h3>
<ol>
  <li><strong>隐藏的 System Reminders</strong>：你会发现 Claude Code 经常在你的 User Message 前面加上一堆 <code class="language-plaintext highlighter-rouge">&lt;system-reminder&gt;</code>。</li>
  <li><strong>真实的 <code class="language-plaintext highlighter-rouge">cache_control</code></strong>：你会看到报文中某些 Block 的末尾带有 <code class="language-plaintext highlighter-rouge">{"type": "ephemeral"}</code> 标记。</li>
  <li><strong>缓存命中情况</strong>：在响应的 <code class="language-plaintext highlighter-rouge">usage</code> 字段中，你会看到 <code class="language-plaintext highlighter-rouge">cache_read_input_tokens</code> 到底省了多少钱。</li>
</ol>

<hr />

<h2 id="3-技术原理kv-cache-与-ttl">3. 技术原理：KV Cache 与 TTL</h2>

<h3 id="31-transformer-的原罪on2-复杂度">3.1 Transformer 的”原罪”：$O(n^2)$ 复杂度</h3>
<p>在 Transformer 架构中，核心的 <strong>Self-Attention（自注意力）</strong> 机制要求每一个 Token 都要与序列中其他所有 Token 计算相关性：</p>
<ul>
  <li><strong>原理</strong>：如果你有 $n$ 个 Token，第 1 个要跟 $n$ 个比，第 2 个也要跟 $n$ 个比……最终需要进行 $n \times n$ 次运算。</li>
  <li><strong>计算成本</strong>：随着序列长度 $n$ 的增加，计算量按<strong>平方级</strong>增长。这意味着 2 倍的长度需要 4 倍的计算资源。</li>
  <li><strong>KV Cache</strong>：为了加速生成过程，模型会将之前计算好的 Key (K) 和 Value (V) 向量存起来，避免重复计算旧 Token 的向量。</li>
</ul>

<h3 id="32-api-的断片无状态设计">3.2 API 的”断片”：无状态设计</h3>
<p>虽然模型内部有 KV Cache，但标准 API 请求结束后会立即清空。下一轮请求，哪怕只多了一个字，也要重新计算之前成千上万个 Token 的 KV 值。</p>

<h3 id="33-prompt-caching跨请求的持久记忆">3.3 Prompt Caching：跨请求的”持久记忆”</h3>
<p>通过在请求中加入 <code class="language-plaintext highlighter-rouge">cache_control</code> （Anthropic API，以下的API相关也指Anthropic API），LLM 厂商会将这部分计算好的 KV Cache 存储在服务端，并分配一个 <strong>TTL（Time-to-Live，生存时间）</strong>。</p>

<ul>
  <li><strong>不同模型的 TTL 策略</strong>：
    <ul>
      <li><strong>Qwen (百炼)</strong>：TTL 默认为 <strong>5 分钟</strong>。每次命中后都会重置这 5 分钟倒计时。</li>
      <li><strong>Anthropic (Claude)</strong>：通常提供 <strong>5 分钟</strong> 或 <strong>1 小时</strong> 两种生存周期（取决于具体的缓存类型和配置）。</li>
      <li><strong>DeepSeek</strong>：不适用上述 TTL 机制。它采用的是<strong>上下文磁盘缓存</strong>，默认开启的，这种方式更加持久，时间一般为几个小时到几天，只要内容命中其缓存池即可。所以我们在claudecode中使用deepseek时，cache_creation_input_tokens总是为0，它不会收取缓存创建的费用。</li>
      <li><strong>GLM：</strong> 自动缓存识别（隐式缓存），智能识别重复的上下文内容，无需手动配置。</li>
    </ul>
  </li>
</ul>

<div class="language-plaintext highlighter-rouge"><div class="highlight"><pre class="highlight"><code>发起 API 请求
    ↓
是否存在缓存前缀？
    ├── 是 → 从缓存服务读取 KV Cache
    │        只计算/推理新增 Token
    │
    └── 否 → 模型重新计算全量 KV Cache
             写入持久化缓存并设置 TTL
    ↓
返回响应
刷新 TTL 倒计时
</code></pre></div></div>

<blockquote>
  <p><strong>重要提示</strong>
<strong>缓存的作用域（隔离机制）</strong>：
缓存并不是全局共享的，通常遵循严格的隔离逻辑（以 Qwen/Claude 为例）：</p>
  <ol>
    <li><strong>账号隔离</strong>：只有同一个账号下的请求才能命中。</li>
    <li><strong>模型隔离</strong>：缓存绑定到特定模型，例如 Qwen3.6 的缓存无法被 Qwen3.5 使用。</li>
    <li><strong>前缀一致性</strong>：必须是 100% 相同的前缀才能触发命中。</li>
  </ol>
</blockquote>

<hr />

<h2 id="4-claude-api-的缓存启用方式">4. Claude API 的缓存启用方式</h2>

<p>在调用 API 时，claude code有两种方式启用 Prompt Caching：</p>

<h3 id="41-自动缓存">4.1 自动缓存</h3>
<p>这是最简便的方式，适合大多数对话场景。只需在请求顶层添加一行：
<code class="language-plaintext highlighter-rouge">"cache_control": {"type": "ephemeral"}</code></p>

<p>示例：</p>
<div class="language-python highlighter-rouge"><div class="highlight"><pre class="highlight"><code><span class="n">client</span> <span class="o">=</span> <span class="n">anthropic</span><span class="p">.</span><span class="n">Anthropic</span><span class="p">()</span>

<span class="n">response</span> <span class="o">=</span> <span class="n">client</span><span class="p">.</span><span class="n">messages</span><span class="p">.</span><span class="n">create</span><span class="p">(</span>
    <span class="n">model</span><span class="o">=</span><span class="s">"claude-opus-4-7"</span><span class="p">,</span>
    <span class="n">max_tokens</span><span class="o">=</span><span class="mi">1024</span><span class="p">,</span>
    <span class="n">cache_control</span><span class="o">=</span><span class="p">{</span><span class="s">"type"</span><span class="p">:</span> <span class="s">"ephemeral"</span><span class="p">},</span>
    <span class="n">system</span><span class="o">=</span><span class="s">"You are a helpful assistant that remembers our conversation."</span><span class="p">,</span>
    <span class="n">messages</span><span class="o">=</span><span class="p">[</span>
        <span class="p">{</span><span class="s">"role"</span><span class="p">:</span> <span class="s">"user"</span><span class="p">,</span> <span class="s">"content"</span><span class="p">:</span> <span class="s">"My name is Alex. I work on machine learning."</span><span class="p">},</span>
        <span class="p">{</span>
            <span class="s">"role"</span><span class="p">:</span> <span class="s">"assistant"</span><span class="p">,</span>
            <span class="s">"content"</span><span class="p">:</span> <span class="s">"Nice to meet you, Alex! How can I help with your ML work today?"</span><span class="p">,</span>
        <span class="p">},</span>
        <span class="p">{</span><span class="s">"role"</span><span class="p">:</span> <span class="s">"user"</span><span class="p">,</span> <span class="s">"content"</span><span class="p">:</span> <span class="s">"What did I say I work on?"</span><span class="p">},</span>
    <span class="p">],</span>
<span class="p">)</span>
<span class="k">print</span><span class="p">(</span><span class="n">response</span><span class="p">.</span><span class="n">usage</span><span class="p">.</span><span class="n">model_dump_json</span><span class="p">())</span>
</code></pre></div></div>
<p>在多轮对话中，系统会自动将缓存断点标记在最后一个可缓存的 Block（通常是最后一条 User 消息）。</p>

<h3 id="42-显式缓存断点">4.2 显式缓存断点</h3>
<p>如果你需要更精细的控制，可以在特定的内容块中手动放置 <code class="language-plaintext highlighter-rouge">cache_control</code>。</p>

<ul>
  <li><strong>核心特性</strong>：
    <ul>
      <li><strong>多重缓存槽</strong>：一个请求中最多可以设置 <strong>4 个</strong> 显式断点。</li>
      <li><strong>累积哈希</strong>：每个断点的缓存内容是<strong>从开头到该断点</strong>的所有内容的哈希值。这意味着只要前面的内容有变，后续所有断点的缓存都会失效。</li>
      <li><strong>缓存层级结构</strong>：Tools  → System → Messages ，每个层级的变化都会使该层级及后续所有层级失效（Tools不支持添加<code class="language-plaintext highlighter-rouge">cache_control</code>, Tools会作为system 消息缓存的一部分）。</li>
    </ul>
  </li>
  <li><strong>适用场景</strong>：
    <ul>
      <li><strong>长 System Prompt</strong>：如果你的系统提示词长达数万 Token，可以单独给它打一个断点。</li>
      <li><strong>固定参考资料</strong>：在 <code class="language-plaintext highlighter-rouge">messages</code> 中间插入大型文档，并在文档末尾设置断点。</li>
    </ul>
  </li>
  <li><strong>配置示例</strong>：
在 <code class="language-plaintext highlighter-rouge">messages</code> 数组或 <code class="language-plaintext highlighter-rouge">system</code> 字段中，将 <code class="language-plaintext highlighter-rouge">content</code> 改为数组形式，并在目标 Block 中注入标记：
    <div class="language-json highlighter-rouge"><div class="highlight"><pre class="highlight"><code><span class="p">{</span><span class="w">
  </span><span class="nl">"role"</span><span class="p">:</span><span class="w"> </span><span class="s2">"system"</span><span class="p">,</span><span class="w">
  </span><span class="nl">"content"</span><span class="p">:</span><span class="w"> </span><span class="p">[</span><span class="w">
    </span><span class="p">{</span><span class="w">
      </span><span class="nl">"type"</span><span class="p">:</span><span class="w"> </span><span class="s2">"text"</span><span class="p">,</span><span class="w">
      </span><span class="nl">"text"</span><span class="p">:</span><span class="w"> </span><span class="s2">"这里是数万 Token 的静态知识库或复杂的系统指令..."</span><span class="p">,</span><span class="w">
      </span><span class="nl">"cache_control"</span><span class="p">:</span><span class="w"> </span><span class="p">{</span><span class="w"> </span><span class="nl">"type"</span><span class="p">:</span><span class="w"> </span><span class="s2">"ephemeral"</span><span class="w"> </span><span class="p">}</span><span class="w">
    </span><span class="p">}</span><span class="w">
  </span><span class="p">]</span><span class="w">
</span><span class="p">}</span><span class="w">
</span></code></pre></div>    </div>
  </li>
</ul>

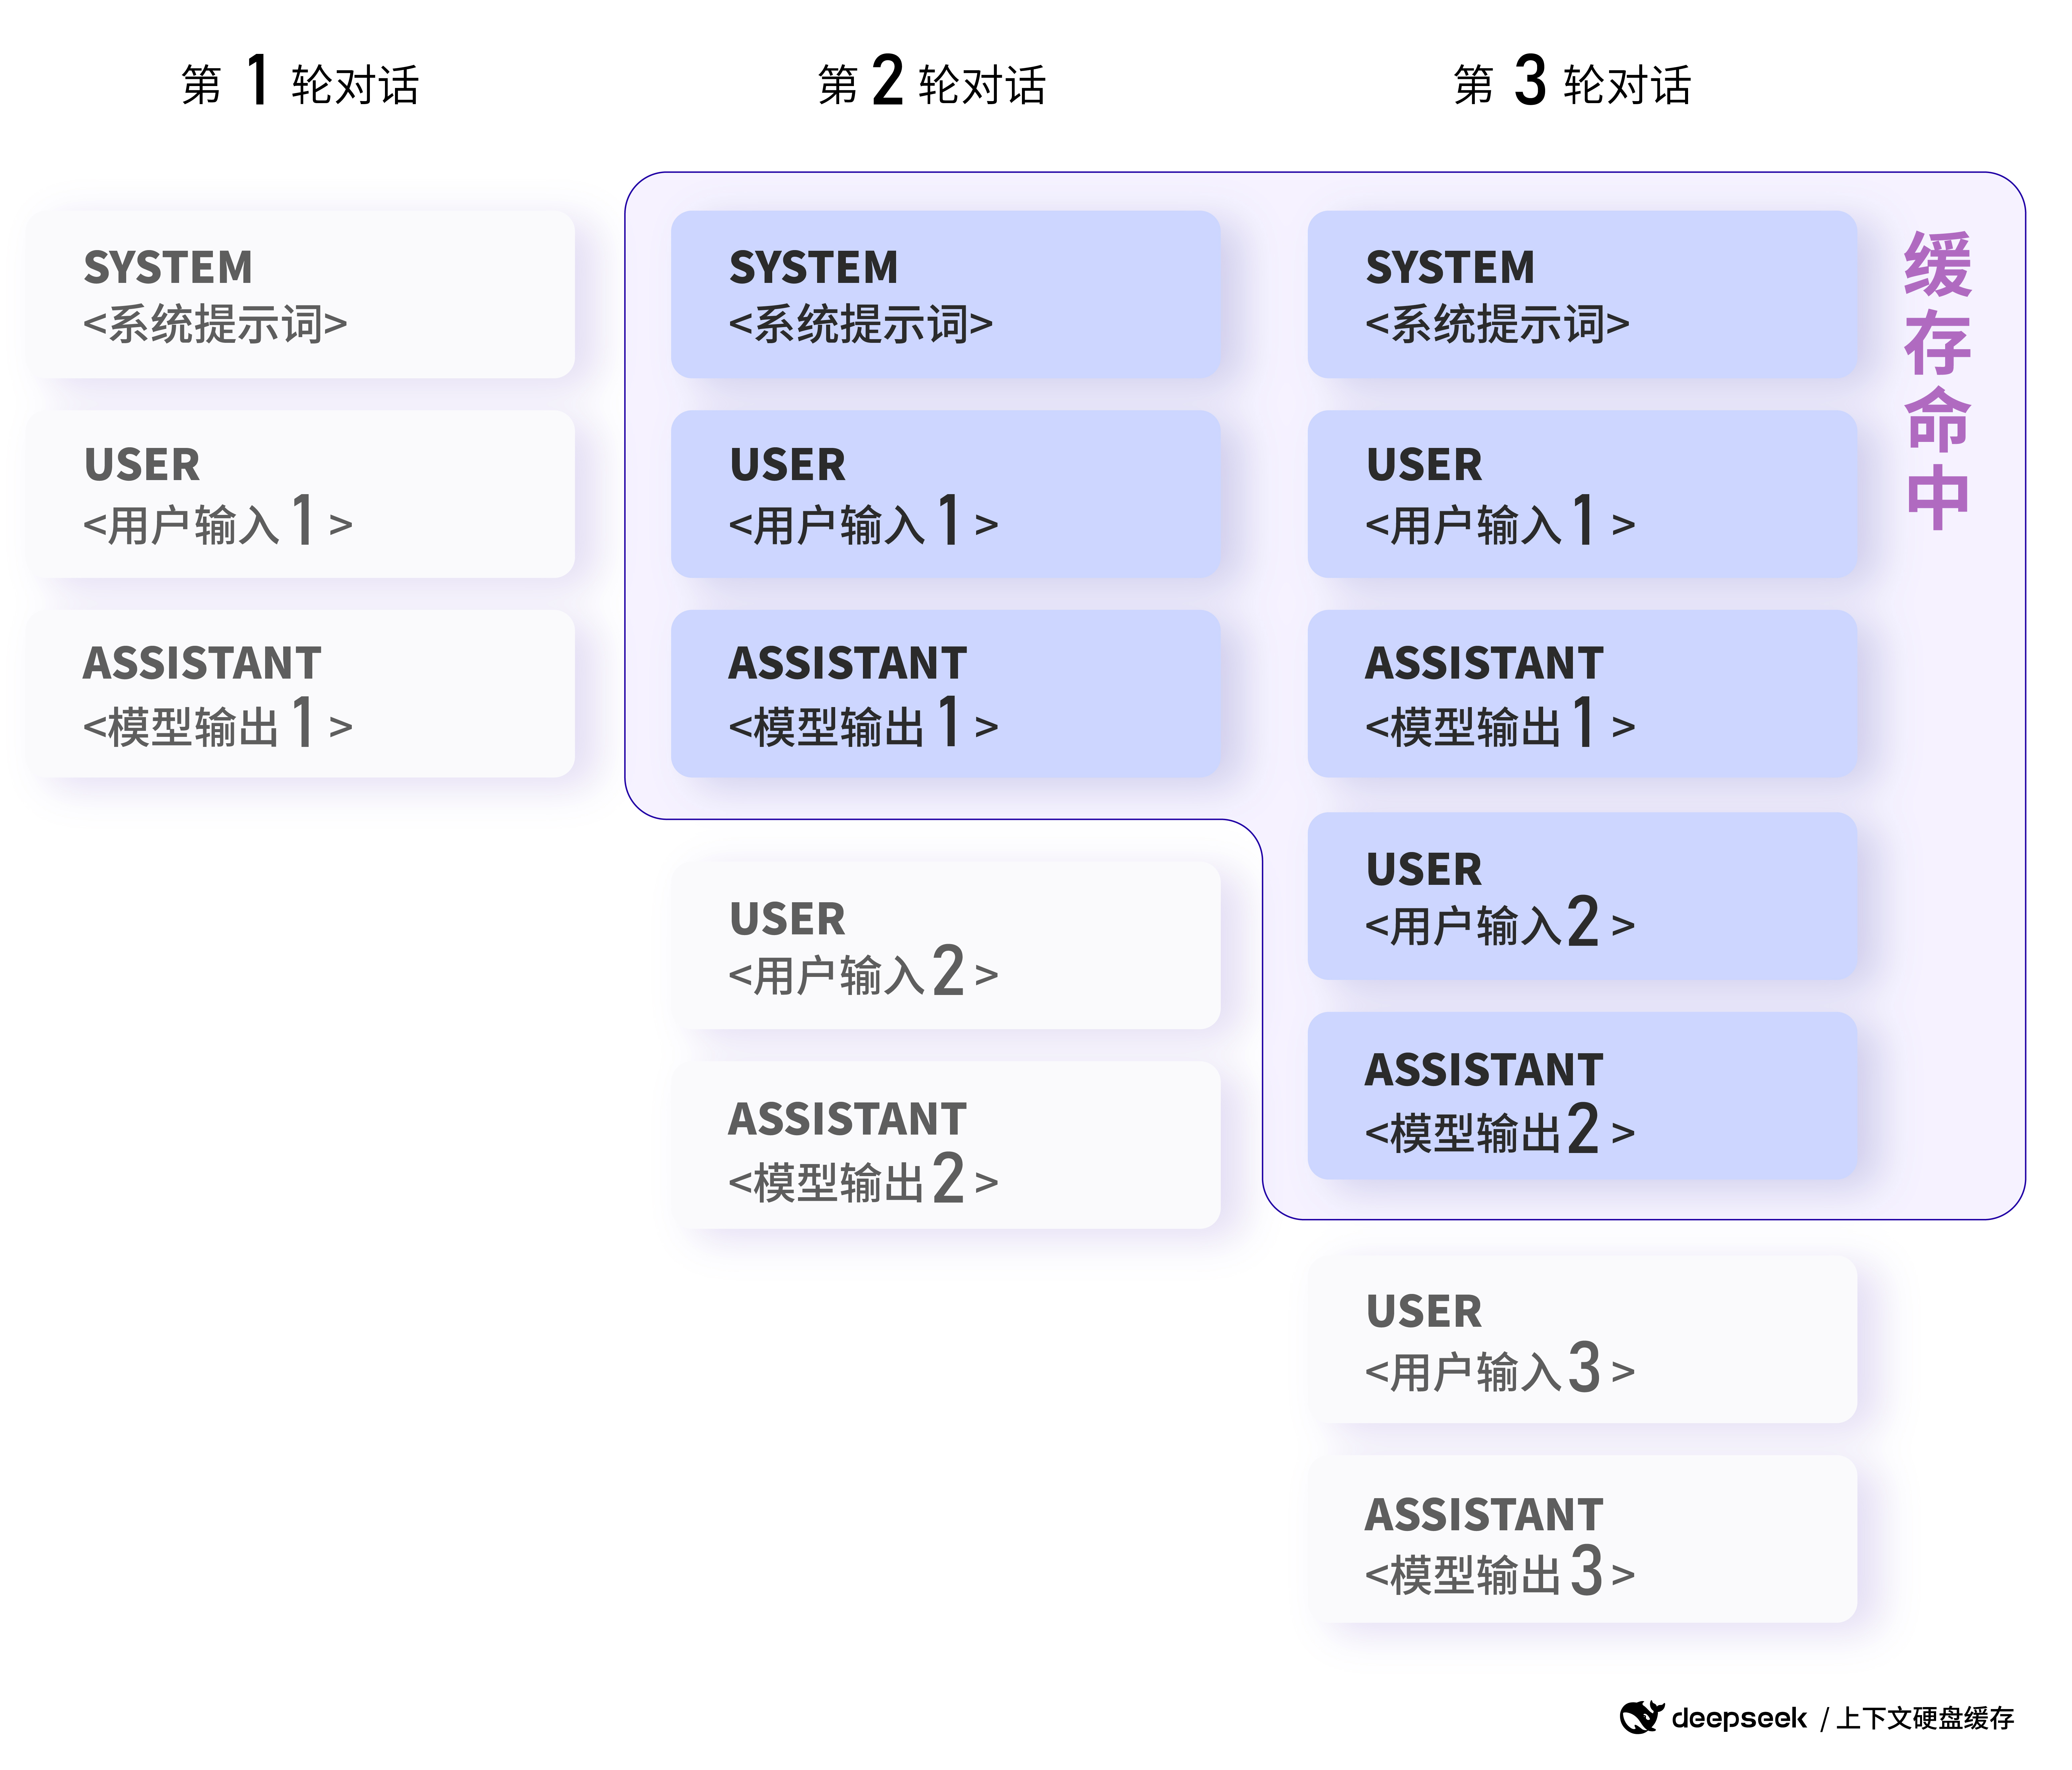
<h3 id="43-机制直观演示多轮对话中的缓存流转">4.3 机制直观演示：多轮对话中的缓存流转</h3>
<p>无论是自动还是显式缓存，Claude Code 在多轮对话中都帮我们默认加了 cache_control, 流转规律如下：</p>

<table>
  <thead>
    <tr>
      <th style="text-align: left">回合</th>
      <th style="text-align: left">发送内容</th>
      <th style="text-align: left">缓存行为</th>
    </tr>
  </thead>
  <tbody>
    <tr>
      <td style="text-align: left"><strong>R1</strong></td>
      <td style="text-align: left">System + User1</td>
      <td style="text-align: left"><strong>写入</strong> System + User1 到缓存</td>
    </tr>
    <tr>
      <td style="text-align: left"><strong>R2</strong></td>
      <td style="text-align: left">System + User1 + Asst1 + User2</td>
      <td style="text-align: left"><strong>读取</strong> S+U1，<strong>写入</strong> A1+U2</td>
    </tr>
    <tr>
      <td style="text-align: left"><strong>R3</strong></td>
      <td style="text-align: left">S + U1 + A1 + U2 + Asst2 + User3</td>
      <td style="text-align: left"><strong>读取</strong> S+U1+A1+U2，<strong>写入</strong> A2+U3</td>
    </tr>
  </tbody>
</table>

<p><img src="/assets/images/llm-context-cache/cache-flow.png" alt="缓存流转示意图" /></p>

<p><strong>通俗易懂地理解缓存差异：</strong></p>
<ul>
  <li><strong>A. 缓存命中</strong>：
<code class="language-plaintext highlighter-rouge">[ 已缓存内容（tools + system prompt + conversation history） ]</code> + <code class="language-plaintext highlighter-rouge">{ 新对话 }</code> → 仅需计算/支付 <code class="language-plaintext highlighter-rouge">{ 新对话 }</code> 的费用，旧内容直接复用。</li>
  <li><strong>B. 缓存失效</strong>：
<code class="language-plaintext highlighter-rouge">[ 过期或无效内容（tools + system prompt + conversation history）]</code> + <code class="language-plaintext highlighter-rouge">{ 新对话 }</code> → <strong>全量</strong> 内容都需要重新计算并重新支付”写入费”。</li>
</ul>

<blockquote>
  <p><strong>续杯机制</strong>：每一轮请求成功后，新的内容都会被写入缓存并重新计时 TTL。只要两次请求间隔小于 TTL，你就可以实现”无限续杯”，只为新增内容支付写入费。</p>
</blockquote>

<h3 id="44-关键约束块匹配与回溯">4.4 关键约束：块匹配与回溯</h3>
<ol>
  <li><strong>100% 匹配</strong>：请求中的<code class="language-plaintext highlighter-rouge">tools[]、system[]、messages.content[]</code>缓存的内容块必须一个字符不差。</li>
  <li><strong>20 Block 回溯</strong>：系统最多往前查找 20 个内容块来寻找曾经写入过的缓存。</li>
  <li><strong>最小阈值</strong>：Claude Sonnet/ Qwen3 通常需要 &gt;1024 Tokens 才开启缓存。</li>
</ol>

<hr />

<h2 id="5-实验数据对比省了多少钱">5. 实验数据对比：省了多少钱？</h2>

<p>我们通过调用 API 后，从 LLM 返回的 <code class="language-plaintext highlighter-rouge">usage</code> 字段中解析相关参数，精准获取了每一轮对话的缓存状态。</p>

<h3 id="51-监控缓存表现">5.1 监控缓存表现</h3>
<p>你可以通过 API 响应中 <code class="language-plaintext highlighter-rouge">usage</code> 对象（如果是流式输出，则在 <code class="language-plaintext highlighter-rouge">message_start</code> 事件中）的以下字段来监控缓存性能：</p>

<ul>
  <li><strong><code class="language-plaintext highlighter-rouge">cache_creation_input_tokens</code></strong>：创建新缓存条目时写入缓存的 Token 数量。</li>
  <li><strong><code class="language-plaintext highlighter-rouge">cache_read_input_tokens</code></strong>：本次请求中从缓存中读取（命中）的 Token 数量。</li>
  <li><strong><code class="language-plaintext highlighter-rouge">input_tokens</code></strong>：既不属于缓存读取也不属于创建缓存的普通输入 Token 数量（即最后一个缓存断点之后的内容）。</li>
</ul>

<p>根据 <code class="language-plaintext highlighter-rouge">ttl_cache_demo.py</code> 的实测数据，我们对比了约 6000+ Tokens 上下文在多轮交互中的费用变化：</p>

<h3 id="52-价格乘数-以-anthropicqwen-为例">5.2 价格乘数 (以 Anthropic/Qwen 为例)</h3>

<p>Qwen 和 Anthropic 的缓存定价乘数一致：</p>
<ul>
  <li><strong>Cache Write</strong> (写入): 基础价格 × <strong>1.25</strong></li>
  <li><strong>Cache Read</strong> (命中): 基础价格 × <strong>0.1</strong> (节省 90%！)</li>
</ul>

<h3 id="53-实测成本对比表-以-qwen-35-实验数据为例">5.3 实测成本对比表 (以 Qwen 3.5 实验数据为例)</h3>

<h4 id="3-轮对话实测数据">3 轮对话实测数据</h4>

<table>
  <thead>
    <tr>
      <th style="text-align: left">场景</th>
      <th style="text-align: left">输入 Tokens (总计)</th>
      <th style="text-align: left">输入成本 (估算)</th>
      <th style="text-align: left">备注</th>
    </tr>
  </thead>
  <tbody>
    <tr>
      <td style="text-align: left"><strong>无缓存场景</strong></td>
      <td style="text-align: left">18,584</td>
      <td style="text-align: left">￥0.003717</td>
      <td style="text-align: left">每次请求都全量重新计算</td>
    </tr>
    <tr>
      <td style="text-align: left"><strong>Prompt Caching</strong></td>
      <td style="text-align: left">18,584</td>
      <td style="text-align: left"><strong>￥0.001802</strong></td>
      <td style="text-align: left"><strong>输入成本节省 ~51.5%</strong></td>
    </tr>
  </tbody>
</table>

<h4 id="计算公式">计算公式</h4>

<p>以 Qwen3.5 价格为例：</p>
<ul>
  <li><strong>输入基础价格</strong>：￥0.2/M tokens</li>
  <li><strong>Cache Write</strong>：基础价格 × <strong>1.25</strong> = ￥0.25/M tokens</li>
  <li><strong>Cache Read</strong>：基础价格 × <strong>0.1</strong> = ￥0.02/M tokens</li>
  <li><strong>输出价格</strong>：￥2.0/M tokens</li>
</ul>

<p>单轮请求的输入成本计算：
\(\text{成本} = \frac{\text{cache\_read} \times 0.02 + \text{cache\_write} \times 0.25 + \text{input\_tokens} \times 0.2}{1,000,000} \text{（元）}\)</p>

<p><strong>无缓存场景</strong>（TTL 过期或首次请求）：
\(\text{成本} = \frac{\text{总输入tokens} \times 0.25}{1,000,000} \text{（全额写入费）}\)</p>

<p><strong>缓存命中场景</strong>：
\(\text{成本} = \frac{\text{命中tokens} \times 0.02 + \text{新增tokens} \times 0.25}{1,000,000}\)</p>

<h4 id="多轮对话成本推演">多轮对话成本推演</h4>

<p>假设每轮对话结构：</p>
<ul>
  <li><strong>固定部分</strong>（System + Tools）：10000 tokens</li>
  <li><strong>历史对话增量</strong>：每轮 +1000 tokens（含 assistant 回复）</li>
  <li><strong>新增用户输入</strong>：200 tokens</li>
</ul>

<table>
  <thead>
    <tr>
      <th style="text-align: center">轮次</th>
      <th style="text-align: left">无缓存输入成本 (￥0.2/M)</th>
      <th style="text-align: left">有缓存输入成本 (￥0.02 命中 + ￥0.25 写入)</th>
      <th style="text-align: center">单轮输入节省</th>
      <th style="text-align: left">累计输入节省</th>
    </tr>
  </thead>
  <tbody>
    <tr>
      <td style="text-align: center">R1</td>
      <td style="text-align: left">10200×0.2 = <strong>￥0.00204</strong></td>
      <td style="text-align: left">10200×0.25 = ￥0.00255</td>
      <td style="text-align: center"><strong>-25%</strong></td>
      <td style="text-align: left">-25%</td>
    </tr>
    <tr>
      <td style="text-align: center">R2</td>
      <td style="text-align: left">11400×0.2 = <strong>￥0.00228</strong></td>
      <td style="text-align: left">10200×0.02+1200×0.25 = ￥0.00050</td>
      <td style="text-align: center"><strong>78.1%</strong></td>
      <td style="text-align: left">26.5%</td>
    </tr>
    <tr>
      <td style="text-align: center">R3</td>
      <td style="text-align: left">12600×0.2 = <strong>￥0.00252</strong></td>
      <td style="text-align: left">11400×0.02+1200×0.25 = ￥0.00053</td>
      <td style="text-align: center"><strong>79.0%</strong></td>
      <td style="text-align: left">44.9%</td>
    </tr>
    <tr>
      <td style="text-align: center">R5</td>
      <td style="text-align: left">15000×0.2 = <strong>￥0.00300</strong></td>
      <td style="text-align: left">13800×0.02+1200×0.25 = ￥0.00058</td>
      <td style="text-align: center"><strong>80.7%</strong></td>
      <td style="text-align: left">59.9%</td>
    </tr>
    <tr>
      <td style="text-align: center">R10</td>
      <td style="text-align: left">19800×0.2 = <strong>￥0.00396</strong></td>
      <td style="text-align: left">18600×0.02+1200×0.25 = ￥0.00067</td>
      <td style="text-align: center"><strong>83.1%</strong></td>
      <td style="text-align: left">72.6%</td>
    </tr>
    <tr>
      <td style="text-align: center">R20</td>
      <td style="text-align: left">29400×0.2 = <strong>￥0.00588</strong></td>
      <td style="text-align: left">28200×0.02+1200×0.25 = ￥0.00092</td>
      <td style="text-align: center"><strong>84.4%</strong></td>
      <td style="text-align: left">81.2%</td>
    </tr>
    <tr>
      <td style="text-align: center">R30</td>
      <td style="text-align: left">39000×0.2 = <strong>￥0.00780</strong></td>
      <td style="text-align: left">37800×0.02+1200×0.25 = ￥0.00118</td>
      <td style="text-align: center"><strong>84.9%</strong></td>
      <td style="text-align: left">84.6%</td>
    </tr>
  </tbody>
</table>

<blockquote>
  <p><strong>关键发现</strong>：</p>
  <ul>
    <li><strong>R1 反而更贵</strong>：首轮需要支付 1.25x 写入费，比无缓存贵 25%</li>
    <li><strong>R2 瞬间回本</strong>：缓存命中后成本骤降 78%，两轮累计已实现正向收益</li>
    <li><strong>边际收益递减</strong>：随着轮次增加，单轮节省比例趋近 <strong>90% 极限</strong></li>
    <li><strong>累计效应显著</strong>：30 轮对话整体节省 <strong>84.6%</strong> 输入成本</li>
  </ul>
</blockquote>

<h4 id="结论">结论</h4>

<p>设每轮新增 $\Delta$ tokens，第 $n$ 轮总输入 tokens 为 $T_n$：</p>

\[\begin{aligned}
\lim_{n \to \infty} \text{节省比例} &amp;= \lim_{n \to \infty} \frac{\text{无缓存成本} - \text{有缓存成本}}{\text{无缓存成本}} \\[8pt]
&amp;= \lim_{n \to \infty} \frac{T_n \times 1 - \left( T_n \times 0.1 + \Delta \times 1.25 \right)}{T_n \times 1} \\[8pt]
&amp;= 1 - 0.1 - \lim_{n \to \infty} \frac{1.25 \Delta}{T_n} \\[8pt]
&amp;= 90\% \quad \left( \text{因为 } \frac{\Delta}{T_n} \to 0 \right)
\end{aligned}\]

<p><strong>核心逻辑</strong>：轮次越多，每轮新增 tokens 占比越小，cache_write (1.25x) 的成本可忽略，几乎所有输入都按 cache_read (0.1x) 计价。</p>

\[\text{有缓存成本} = \underbrace{T_n \times 0.1}_{\text{cache read部分成本}} + \underbrace{\Delta \times 1.25}_{\text{cache creation部分成本}}\]

<p>随着请求量 $n$ 的增大，总请求Tokens输入的量 $T_n$ 线性增长（$T_n \to \infty$）。</p>

\[\lim_{n \to \infty} \frac{1.25 \Delta}{T_n} = 0\]

<p>这意味着<strong>每轮会话新增 $\Delta$ tokens 在当前会话历史上下文tokens总和 $T_n$ 面前变得微不足道</strong>。</p>

<p><strong>轮次越多，缓存命中占比越高，成本越接近理论极限 90%</strong>。在长对话或 Agent 循环场景中，Prompt Caching 是降本增效的利器。</p>

<blockquote>
  <p><strong>成本节省潜力</strong>：
以上实测数据仅基于 3 轮对话。在 20-30 轮的长对话或 Agent 循环中，随着 <strong>命中 (0.1x)</strong> 占比不断提高，输入侧的成本节省通常能达到 <strong>80% - 90%</strong>，同时能显著降低首字延迟（TTFT）。</p>
</blockquote>

<hr />

<h2 id="6-实战建议如何更省钱">6. 实战建议：如何更省钱？</h2>

<ol>
  <li><strong>不要中途切换模型</strong>：缓存是模型隔离的。如果你从 <code class="language-plaintext highlighter-rouge">qwen3.5</code> 切换到 <code class="language-plaintext highlighter-rouge">qwen3.6</code>，哪怕上下文完全一样，之前的缓存也无法被新模型读取，会导致昂贵的重新写入。</li>
  <li><strong>离场前压缩</strong>：若需长时间离开（超过 5 分钟），可以使用 Claude Code 的 <code class="language-plaintext highlighter-rouge">/compact</code> 或相关命令触发总结机制，将繁琐的对话历史压缩为 <code class="language-plaintext highlighter-rouge">memory</code>，下次回来时虽然 TTL 已过，但起点的 Token 总数会显著降低。</li>
  <li><strong>定期减负</strong>：养成使用 <code class="language-plaintext highlighter-rouge">/clear</code> 或 <code class="language-plaintext highlighter-rouge">/rewind</code> 的习惯。不要让上下文无限制增长，及时清理掉不再需要的中间过程。</li>
  <li><strong>集中饱和式工作</strong>：利用 TTL 的 5min 规则。在处理复杂任务时，尽量在 5 分钟内连续提问，保障缓存始终处于存活状态，最大化利用 0.1x 的命中价格。</li>
  <li><strong>监控命中率</strong>：通过检查 API 返回 <code class="language-plaintext highlighter-rouge">usage</code> 字段的习惯，或者通过 <code class="language-plaintext highlighter-rouge">/usage</code> 或者<code class="language-plaintext highlighter-rouge">statusline</code> 实时观察 <code class="language-plaintext highlighter-rouge">cache_read_input_tokens</code>。只有让自己清楚看到钱花在哪里了，才能总结出自己的省钱方法。</li>
  <li><strong>不要动态调整 Skills</strong>：添加或删除 Skill 会改变系统提示词（Skills 定义会被注入到 System Prompt 中），导致前缀发生变化，从而使 User Prompt 缓存失效。如需调整 Skills，建议在新会话中进行。</li>
</ol>

<blockquote>
  <p>更多关于缓存失效的官方说明，请参考：<a href="https://platform.claude.com/docs/en/build-with-claude/prompt-caching#what-invalidates-the-cache">Anthropic Prompt Caching Documentation</a></p>
</blockquote>]]></content><author><name></name></author><category term="ai" /><category term="llm" /><category term="llm" /><category term="cache" /><summary type="html"><![CDATA[1. 引言：为什么我们要聊”上下文缓存”？]]></summary></entry><entry><title type="html">fcitx5-rime 输入法配置</title><link href="/linux/input-method/2026/05/11/fcitx5-rime%E9%9B%BE%E5%87%87%E6%8B%BC%E9%9F%B3.html" rel="alternate" type="text/html" title="fcitx5-rime 输入法配置" /><published>2026-05-11T13:00:00+00:00</published><updated>2026-05-11T13:00:00+00:00</updated><id>/linux/input-method/2026/05/11/fcitx5-rime%E9%9B%BE%E5%87%87%E6%8B%BC%E9%9F%B3</id><content type="html" xml:base="/linux/input-method/2026/05/11/fcitx5-rime%E9%9B%BE%E5%87%87%E6%8B%BC%E9%9F%B3.html"><![CDATA[<h2 id="前言rime-输入法简介">前言：Rime 输入法简介</h2>

<p>Rime 全称为「Rime 中州韵输入法引擎」，通常简称为 Rime 或中州韵。</p>

<ul>
  <li>官网：<a href="https://rime.im/">RIME | 中州韻輸入法引擎</a></li>
  <li>特点：
    <ul>
      <li>提供核心框架，支持 Windows、macOS、Linux、Android、iOS 等多平台</li>
      <li>无云端服务器，全部词库和配置均在本地</li>
      <li>使用 YAML 格式配置文件，可自定义候选框皮肤、词库、输入逻辑等</li>
    </ul>
  </li>
</ul>

<hr />

<h2 id="一fcitx5-rime-安装与启用">一、fcitx5-rime 安装与启用</h2>

<h3 id="11-安装">1.1 安装</h3>

<div class="language-bash highlighter-rouge"><div class="highlight"><pre class="highlight"><code><span class="nb">sudo </span>apt <span class="nb">install </span>fcitx5 fcitx5-configtool fcitx5-rime
</code></pre></div></div>

<p>如果是 GNOME 环境，还需安装：</p>

<div class="language-bash highlighter-rouge"><div class="highlight"><pre class="highlight"><code><span class="nb">sudo </span>apt <span class="nb">install </span>fcitx5-frontend-gtk3 fcitx5-frontend-gtk4
</code></pre></div></div>

<h3 id="12-配置环境变量">1.2 配置环境变量</h3>

<p>编辑 <code class="language-plaintext highlighter-rouge">/etc/environment</code> 文件，添加以下内容：</p>

<div class="language-bash highlighter-rouge"><div class="highlight"><pre class="highlight"><code><span class="nv">GTK_IM_MODULE</span><span class="o">=</span>fcitx
<span class="nv">QT_IM_MODULE</span><span class="o">=</span>fcitx
<span class="nv">XMODIFIERS</span><span class="o">=</span><span class="s2">"@im=fcitx"</span>
</code></pre></div></div>

<h3 id="13-设置自启动">1.3 设置自启动</h3>

<p>在 GNOME 中：</p>
<ol>
  <li>打开「优化」（tweaks）</li>
  <li>进入「开机启动程序」</li>
  <li>添加 <code class="language-plaintext highlighter-rouge">fcitx5</code></li>
</ol>

<h3 id="14-启用-rime-输入法">1.4 启用 Rime 输入法</h3>

<ol>
  <li>在系统托盘右键点击「小企鹅」图标，或在终端执行：
    <div class="language-bash highlighter-rouge"><div class="highlight"><pre class="highlight"><code>fcitx5-configtool
</code></pre></div>    </div>
  </li>
  <li>进入配置界面后，将右面板「可用输入法」中的 <strong>中州韵</strong> 或 <strong>rime</strong> 添加到左侧「当前输入法」</li>
  <li>点击「应用」即可启用</li>
</ol>

<blockquote>
  <p><strong>提示</strong>：此时 Rime 还是基础版本，建议继续配置雾凇拼音以获得更好的体验。</p>
</blockquote>

<hr />

<h2 id="二雾凇拼音配置">二、雾凇拼音配置</h2>

<h3 id="21-安装">2.1 安装</h3>

<h4 id="方案一手动安装">方案一：手动安装</h4>

<ol>
  <li>下载 <a href="https://github.com/iDvel/rime-ice/releases">雾凇拼音</a></li>
  <li>解压，复制并覆盖所有文件到输入法「用户目录」：
    <div class="language-bash highlighter-rouge"><div class="highlight"><pre class="highlight"><code>~/.local/share/fcitx5/rime
</code></pre></div>    </div>
  </li>
  <li>使用「中州韵」输入法，调出输入框后按快捷键 <strong>F4</strong> 或 <strong>Ctrl+`</strong> 选择「雾凇拼音」</li>
</ol>

<h4 id="方案二使用-plum-配方管理工具推荐">方案二：使用 plum 配方管理工具（推荐）</h4>

<div class="language-bash highlighter-rouge"><div class="highlight"><pre class="highlight"><code><span class="c"># 下载 plum</span>
git clone https://github.com/rime/plum.git

<span class="c"># 进入目录并安装</span>
<span class="nb">cd </span>plum
</code></pre></div></div>

<p>选择以下安装方式：</p>

<div class="language-bash highlighter-rouge"><div class="highlight"><pre class="highlight"><code><span class="c"># 默认安装</span>
bash rime-install iDvel/rime-ice

<span class="c"># 或为 fcitx5 安装</span>
<span class="nv">rime_frontend</span><span class="o">=</span>fcitx5-rime bash rime-install iDvel/rime-ice
</code></pre></div></div>

<blockquote>
  <p>更多详细指南参考：<a href="https://github.com/iDvel/rime-ice/blob/main/others/docs/Installation.md">安装文档</a></p>
</blockquote>

<p>执行后配置文件默认位于 <code class="language-plaintext highlighter-rouge">~/.local/share/fcitx5/rime</code> 目录下。</p>

<hr />

<h3 id="22-配置可选">2.2 配置（可选）</h3>

<blockquote>
  <p>以下配置根据个人使用习惯按需设置。</p>
</blockquote>

<p>配置目录：<code class="language-plaintext highlighter-rouge">~/.local/share/fcitx5/rime</code></p>

<h4 id="开启逗号句号翻页">开启逗号、句号翻页</h4>

<p>修改 <code class="language-plaintext highlighter-rouge">default.yaml</code> 或 <code class="language-plaintext highlighter-rouge">default.custom.yaml</code>：</p>

<div class="language-bash highlighter-rouge"><div class="highlight"><pre class="highlight"><code><span class="nb">sed</span> <span class="nt">-i</span> <span class="s1">'s/# \(- { when: \(paging\|has_menu\), accept: \(comma\|period\), send: Page_\(Up\|Down\) }\)/\1/'</span> default.yaml
</code></pre></div></div>

<h4 id="更改候选词数量">更改候选词数量</h4>

<div class="language-bash highlighter-rouge"><div class="highlight"><pre class="highlight"><code><span class="nb">sed</span> <span class="nt">-i</span> <span class="s1">'s/page_size: 5/page_size: 9/'</span> default.yaml
</code></pre></div></div>

<hr />

<h2 id="三万象拼音大模型配置">三、万象拼音大模型配置</h2>

<p>GitHub 地址：<a href="https://github.com/amzxyz/rime_wanxiang">rime_wanxiang</a></p>

<h3 id="31-安装">3.1 安装</h3>

<p>下载 GitHub Release 中最新的语法模型文件：<code class="language-plaintext highlighter-rouge">wanxiang-lts-zh-hans.gram</code></p>

<h3 id="32-配置">3.2 配置</h3>

<ol>
  <li>将下载的 <code class="language-plaintext highlighter-rouge">wanxiang-lts-zh-hans.gram</code> 放到输入法用户目录根目录：
    <div class="language-bash highlighter-rouge"><div class="highlight"><pre class="highlight"><code>~/.local/share/fcitx5/rime
</code></pre></div>    </div>
  </li>
  <li>
    <p>新建或编辑 <code class="language-plaintext highlighter-rouge">rime_ice.custom.yaml</code> 文件，添加以下内容：</p>

    <div class="language-yaml highlighter-rouge"><div class="highlight"><pre class="highlight"><code><span class="na">patch</span><span class="pi">:</span>
  <span class="na">grammar</span><span class="pi">:</span>
    <span class="na">language</span><span class="pi">:</span> <span class="s">wanxiang-lts-zh-hans</span>
    <span class="na">collocation_max_length</span><span class="pi">:</span> <span class="m">5</span>
    <span class="na">collocation_min_length</span><span class="pi">:</span> <span class="m">2</span>
  <span class="na">translator/contextual_suggestions</span><span class="pi">:</span> <span class="no">true</span>
  <span class="na">translator/max_homophones</span><span class="pi">:</span> <span class="m">7</span>
  <span class="na">translator/max_homographs</span><span class="pi">:</span> <span class="m">7</span>
</code></pre></div>    </div>
  </li>
  <li>重启 fcitx5 使配置生效</li>
</ol>

<h3 id="33-验证生效">3.3 验证生效</h3>

<p>检测是否生效可参考项目的 README 说明和介绍。</p>

<hr />

<h2 id="四注意事项">四、注意事项</h2>

<blockquote>
  <p><strong>重要</strong>：以上所有配置修改后，都需要重新启动 fcitx5 才能生效。</p>
</blockquote>]]></content><author><name></name></author><category term="linux" /><category term="input-method" /><category term="linux" /><category term="fcitx" /><category term="rime" /><summary type="html"><![CDATA[前言：Rime 输入法简介]]></summary></entry><entry><title type="html">Cloudflare 代理节点搭建</title><link href="/linux/%E7%BD%91%E7%BB%9C/2026/05/11/cloudflare-edgetunnel-serverless-proxy.html" rel="alternate" type="text/html" title="Cloudflare 代理节点搭建" /><published>2026-05-11T00:00:00+00:00</published><updated>2026-05-11T00:00:00+00:00</updated><id>/linux/%E7%BD%91%E7%BB%9C/2026/05/11/cloudflare-edgetunnel-serverless-proxy</id><content type="html" xml:base="/linux/%E7%BD%91%E7%BB%9C/2026/05/11/cloudflare-edgetunnel-serverless-proxy.html"><![CDATA[<blockquote>
  <p>使用 Cloudflare Pages 部署 <code class="language-plaintext highlighter-rouge">edgetunnel</code> 搭建代理节点的方案，是近年来非常流行的一种 <strong>Serverless（无服务器）</strong> 翻墙技术。</p>

  <p><strong>核心思想</strong>：利用 Cloudflare 遍布全球的边缘计算能力，将代理服务端代码运行在离你最近的 CDN 节点上。</p>
</blockquote>

<hr />

<h2 id="一名词解释">一、名词解释</h2>

<h3 id="11-cloudflare基础设施全球分发网络">1.1 Cloudflare（基础设施：全球分发网络）</h3>

<blockquote>
  <p>官网：<a href="https://dash.cloudflare.com/">https://dash.cloudflare.com/</a></p>
</blockquote>

<p>Cloudflare (CF) 是全球最大的 CDN（内容分发网络）和网络安全公司之一。选择它搭建代理有以下三个关键特点：</p>

<table>
  <thead>
    <tr>
      <th>特性</th>
      <th>说明</th>
    </tr>
  </thead>
  <tbody>
    <tr>
      <td><strong>Anycast 任播网络</strong></td>
      <td>CF 在全球拥有数百个数据中心。用户访问时，请求自动路由到物理距离最近的节点</td>
    </tr>
    <tr>
      <td><strong>边缘计算 (Workers/Pages)</strong></td>
      <td>传统 CDN 只分发静态文件，而 CF 允许在边缘节点直接运行代码（JavaScript/WebAssembly），即本次利用的 <code class="language-plaintext highlighter-rouge">Workers</code> 和 <code class="language-plaintext highlighter-rouge">Pages</code> 功能</td>
    </tr>
    <tr>
      <td><strong>反向代理护盾</strong></td>
      <td>对后端服务器而言，CF 是反向代理。用户只能看到 CF 的 IP，无法获取真实服务器 IP</td>
    </tr>
  </tbody>
</table>

<h3 id="12-edgetunnel程序逻辑协议转换网关">1.2 Edgetunnel（程序逻辑：协议转换网关）</h3>

<blockquote>
  <p>GitHub：<a href="https://github.com/cmliu/edgetunnel">https://github.com/cmliu/edgetunnel</a></p>
</blockquote>

<p><code class="language-plaintext highlighter-rouge">edgetunnel</code> 是运行在 Cloudflare 边缘环境（Workers 或 Pages）中的<strong>脚本代码</strong>。</p>

<table>
  <thead>
    <tr>
      <th>特性</th>
      <th>说明</th>
    </tr>
  </thead>
  <tbody>
    <tr>
      <td><strong>逻辑核心</strong></td>
      <td>利用 Node.js 的流处理（Stream）或 <code class="language-plaintext highlighter-rouge">fetch</code> API，解析 <strong>VLESS</strong> 协议</td>
    </tr>
    <tr>
      <td><strong>白嫖服务器</strong></td>
      <td>通常代理需要一台 VPS，但 <code class="language-plaintext highlighter-rouge">edgetunnel</code> 让 Cloudflare 边缘节点充当服务器</td>
    </tr>
    <tr>
      <td><strong>协议转换</strong></td>
      <td>在边缘节点监听 WebSocket 连接，拆解代理请求并重新发起请求</td>
    </tr>
  </tbody>
</table>

<hr />

<h2 id="二工作原理">二、工作原理</h2>

<p>本架构可拆解为三个核心原理：</p>

<h3 id="21-运行载体边缘计算">2.1 运行载体：边缘计算</h3>

<p>传统 VPN 需要购买拥有公网 IP 的 VPS 服务器，而 Cloudflare Pages 提供了 <strong>Edge Computing（边缘计算）</strong> 能力：</p>

<ul>
  <li>代码不运行在固定服务器上，而是分发到全球数百个数据中心</li>
  <li><code class="language-plaintext highlighter-rouge">edgetunnel</code> 本质是用 JavaScript（或 WebAssembly）编写的反向代理程序</li>
  <li>Cloudflare 的 V8 引擎提供运行环境</li>
</ul>

<h3 id="22-传输协议vless--websocket-wss">2.2 传输协议：VLESS + WebSocket (WSS)</h3>

<p>Cloudflare CDN 节点默认只处理标准 HTTP/HTTPS 流量，代理数据需进行伪装封装：</p>

<table>
  <thead>
    <tr>
      <th>协议</th>
      <th>作用</th>
    </tr>
  </thead>
  <tbody>
    <tr>
      <td><strong>WebSocket (WS)</strong></td>
      <td>CF 支持将 HTTP 连接升级为 WebSocket 长连接。代理流量包裹在 WS 数据帧中，表面看像在实时通信</td>
    </tr>
    <tr>
      <td><strong>VLESS 协议</strong></td>
      <td>Xray-core 提出的轻量级代理协议。<code class="language-plaintext highlighter-rouge">edgetunnel</code> 解析 VLESS，验证 UUID（密码）并提取目标地址</td>
    </tr>
  </tbody>
</table>

<h3 id="23-网络拓扑与流量转发">2.3 网络拓扑与流量转发</h3>

<p>这是最关键的”偷天换日”过程。当你访问 YouTube 时，流量路径如下：</p>

<div class="language-plaintext highlighter-rouge"><div class="highlight"><pre class="highlight"><code>┌─────────────────────────────────────────────────────────────────────────┐
│  用户设备 (Client)                                                       │
│  ↓ 封装: TLS [ WS [ VLESS [ Data ] ] ]                                  │
├─────────────────────────────────────────────────────────────────────────┤
│  防火墙 (GFW)                                                            │
│  ↓ 检测 SNI 和协议特征 → 识别为标准 HTTPS 访问，放行                      │
├─────────────────────────────────────────────────────────────────────────┤
│  CF Pages (边缘节点)                                                     │
│  ↓ 1. TLS 解密  2. 建立 WebSocket 连接  3. Edgetunnel 校验 VLESS UUID    │
├─────────────────────────────────────────────────────────────────────────┤
│  目标网站 (Target)                                                       │
│  ← 以机房身份发起 Raw TCP/HTTP 请求                                      │
│  → 返回原始网页数据                                                       │
├─────────────────────────────────────────────────────────────────────────┤
│  CF Pages (边缘节点)                                                     │
│  ↓ 重新进行 VLESS + WS + TLS 封装                                        │
├─────────────────────────────────────────────────────────────────────────┤
│  用户设备 (Client)                                                       │
│  ← 通过建立好的隧道回传数据 → 客户端解包后呈现内容                         │
└─────────────────────────────────────────────────────────────────────────┘
</code></pre></div></div>

<hr />

<h2 id="三方案优缺点">三、方案优缺点</h2>

<h3 id="-优势">✅ 优势</h3>

<table>
  <thead>
    <tr>
      <th>优势</th>
      <th>说明</th>
    </tr>
  </thead>
  <tbody>
    <tr>
      <td><strong>完全免费</strong></td>
      <td>只要流量不极其夸张，Cloudflare Pages 免费额度（每天 10 万次请求）对个人绝对够用</td>
    </tr>
    <tr>
      <td><strong>抗封锁能力强</strong></td>
      <td>Cloudflare IP 数量庞大且属于商业 CDN IP，GFW 难以全面封杀（易误杀正常外贸业务）</td>
    </tr>
    <tr>
      <td><strong>免维护服务器</strong></td>
      <td>无需操心 Linux 系统安全更新、DDoS 防护等运维问题</td>
    </tr>
  </tbody>
</table>

<h3 id="️-劣势风险">⚠️ 劣势/风险</h3>

<table>
  <thead>
    <tr>
      <th>劣势</th>
      <th>说明</th>
    </tr>
  </thead>
  <tbody>
    <tr>
      <td><strong>速度受限与优选 IP 依赖</strong></td>
      <td>如不通过脚本寻找并绑定”优选 IP”，国内直连 Cloudflare 节点延迟往往很高</td>
    </tr>
    <tr>
      <td><strong>Cloudflare 封号风险</strong></td>
      <td><code class="language-plaintext highlighter-rouge">edgetunnel</code> 本质是将 CF 的 Web 服务滥用成大流量隧道代理，违反 ToS。单账户月流量达几百 GB ~ TB 级别极易被封禁</td>
    </tr>
  </tbody>
</table>

<hr />

<h2 id="四部署步骤">四、部署步骤</h2>

<h3 id="41-准备工作">4.1 准备工作</h3>

<table>
  <thead>
    <tr>
      <th>项目</th>
      <th>链接</th>
    </tr>
  </thead>
  <tbody>
    <tr>
      <td>Cloudflare 平台</td>
      <td><a href="https://dash.cloudflare.com/">https://dash.cloudflare.com/</a></td>
    </tr>
    <tr>
      <td>edgetunnel 源码</td>
      <td><a href="https://github.com/cmliu/edgetunnel/archive/refs/heads/main.zip">点击下载 ZIP</a></td>
    </tr>
  </tbody>
</table>

<h3 id="42-必选步骤">4.2 必选步骤</h3>

<h4 id="step-1创建-kv-存储空间">Step 1：创建 KV 存储空间</h4>

<p>进入 Cloudflare 控制台：</p>

<div class="language-plaintext highlighter-rouge"><div class="highlight"><pre class="highlight"><code>左侧栏 → 存储和数据库 → Workers KV → Create Instance
</code></pre></div></div>

<p>填写实例名称（如 <code class="language-plaintext highlighter-rouge">helloworld-kv</code>），然后创建。</p>

<blockquote>
  <p>💡 <strong>KV 是什么</strong>：存储数据库，用于存放 <code class="language-plaintext highlighter-rouge">edgetunnel</code> 运行所需的配置数据。</p>
</blockquote>

<hr />

<h4 id="step-2部署-pages-脚本">Step 2：部署 Pages 脚本</h4>

<div class="language-plaintext highlighter-rouge"><div class="highlight"><pre class="highlight"><code>左侧栏 → 计算 → Workers 和 Pages → 创建应用程序
→ 选择 "Pages" → 拖放文件上传
→ 项目名（如 helloworld）
→ 上传提前下载的 edgetunnel 压缩包
→ 部署站点
</code></pre></div></div>

<hr />

<h4 id="step-3设置管理员密码">Step 3：设置管理员密码</h4>

<p>部署完成后：</p>

<div class="language-plaintext highlighter-rouge"><div class="highlight"><pre class="highlight"><code>点击 "继续处理站点" → 设置 → 环境变量
→ "制作" 为生产环境定义变量 → 添加变量
</code></pre></div></div>

<table>
  <thead>
    <tr>
      <th>变量名称</th>
      <th>值</th>
    </tr>
  </thead>
  <tbody>
    <tr>
      <td><code class="language-plaintext highlighter-rouge">ADMIN</code></td>
      <td>你的管理员密码</td>
    </tr>
  </tbody>
</table>

<p>点击 <strong>保存</strong>。</p>

<hr />

<h4 id="step-4绑定-kv-命名空间">Step 4：绑定 KV 命名空间</h4>

<div class="language-plaintext highlighter-rouge"><div class="highlight"><pre class="highlight"><code>Workers 和 Pages → 点击项目名 → 设置 → 绑定
→ + 添加 → KV 命名空间
</code></pre></div></div>

<table>
  <thead>
    <tr>
      <th>变量名称</th>
      <th>KV 命名空间</th>
    </tr>
  </thead>
  <tbody>
    <tr>
      <td><code class="language-plaintext highlighter-rouge">KV</code></td>
      <td>刚创建的 KV 实例</td>
    </tr>
  </tbody>
</table>

<p>点击 <strong>保存</strong>，然后<strong>重新部署</strong>。</p>

<hr />

<h4 id="step-5进入-edgetunnel-后台">Step 5：进入 edgetunnel 后台</h4>

<p>部署完成后，在 <code class="language-plaintext highlighter-rouge">Workers 和 Pages / helloworld</code> 页面找到 <strong>生产域</strong>，访问地址：</p>

<div class="language-plaintext highlighter-rouge"><div class="highlight"><pre class="highlight"><code>https://helloworld-a0f.pages.dev/login
</code></pre></div></div>

<p>输入 <code class="language-plaintext highlighter-rouge">ADMIN</code> 密码登录，即可在 <strong>获取节点链接</strong> 中复制节点。</p>

<hr />

<h4 id="step-6速度优化重要">Step 6：速度优化（重要）</h4>

<blockquote>
  <p>⚠️ 默认网络质量较差，建议进行以下优化</p>
</blockquote>

<p>登录后台后，点击 <strong>“我是高手！我就要折腾！”</strong>，进行如下配置：</p>

<p><strong>① 基础优化</strong></p>

<ul>
  <li><strong>详细配置信息</strong> → 勾选 “启动 0-RTT”</li>
  <li><strong>Encrypted Client Hello</strong> → 勾选 “启动”</li>
</ul>

<blockquote>
  <p>💡 <strong>ECH 说明</strong>：WS + TLS 节点通信内容虽已加密，但 TLS 握手阶段仍会暴露 SNI（节点伪装域名 HOST）。ECH 将 SNI 也加密，外部观察到的域名统一显示为 <code class="language-plaintext highlighter-rouge">cloudflare-ech.com</code>。</p>
</blockquote>

<p><strong>② 订阅转换配置</strong></p>

<div class="language-plaintext highlighter-rouge"><div class="highlight"><pre class="highlight"><code>订阅转换配置 → 选择：
"识别多地区、CloudFlareCDN负载均衡CF节点专用CM_Online_Full_multiMode_CF"
</code></pre></div></div>

<p><strong>③ 添加优选 IP</strong></p>

<p>进入 <a href="https://bestcf.pages.dev/">bestcf</a> 获取推荐 IP，然后在后台配置：</p>

<div class="language-plaintext highlighter-rouge"><div class="highlight"><pre class="highlight"><code>优选订阅生成 → 选择 "自定义订阅（支持汇聚订阅）"
→ 填入优选地址
</code></pre></div></div>

<p>推荐优选订阅地址：</p>

<div class="language-plaintext highlighter-rouge"><div class="highlight"><pre class="highlight"><code>https://bestcf.pages.dev/domain/all.txt
https://bestcf.pages.dev/vps789/top20.txt
https://bestcf.pages.dev/gslege/Cfxyz.txt
https://bestcf.pages.dev/gslege/SG.txt
https://bestcf.pages.dev/gslege/JP.txt
https://bestcf.pages.dev/gslege/US.txt
https://raw.githubusercontent.com/HandsomeMJZ/cfip/refs/heads/main/best_ips.txt
</code></pre></div></div>

<hr />

<h4 id="step-7获取节点链接">Step 7：获取节点链接</h4>

<p>展开 <strong>获取节点链接</strong>，根据客户端类型（v2rayN / sing-box / Clash 等）获取对应订阅链接。</p>

<hr />

<h3 id="43-可选步骤自定义域名">4.3 可选步骤：自定义域名</h3>

<blockquote>
  <p>使用 <a href="https://www.dnshe.com/">dnshe</a> 注册免费域名（送 5 个永久免费域名，根域名选择 <code class="language-plaintext highlighter-rouge">ccwu.cc</code> 或 <code class="language-plaintext highlighter-rouge">cc.cd</code>）</p>
</blockquote>

<h4 id="step-1创建域名">Step 1：创建域名</h4>

<p>登入 <a href="https://www.dnshe.com/">dnshe</a>：</p>

<div class="language-plaintext highlighter-rouge"><div class="highlight"><pre class="highlight"><code>Free Domains → 注册新域名
</code></pre></div></div>

<p>获取新域名（如 <code class="language-plaintext highlighter-rouge">zilong78.cc.cd</code>）。</p>

<hr />

<h4 id="step-2申请-dns-服务器">Step 2：申请 DNS 服务器</h4>

<p>登入 <a href="https://dash.cloudflare.com/">Cloudflare</a>：</p>

<div class="language-plaintext highlighter-rouge"><div class="highlight"><pre class="highlight"><code>账户主页 → 域 → 添加域名
→ 粘贴新域名（zilong78.cc.cd）
→ 继续 → 选择 Free 计划
→ 继续前往激活
→ 复制 CF 分配的两个 DNS 服务器地址
</code></pre></div></div>

<hr />

<h4 id="step-3绑定-dns-服务器">Step 3：绑定 DNS 服务器</h4>

<p><strong>① 在 dnshe 中配置</strong></p>

<div class="language-plaintext highlighter-rouge"><div class="highlight"><pre class="highlight"><code>新域名 → DNS 服务器 → 添加 CF 的两个 DNS 服务器
→ 保存配置
</code></pre></div></div>

<p><strong>② 在 Cloudflare 中确认</strong></p>

<div class="language-plaintext highlighter-rouge"><div class="highlight"><pre class="highlight"><code>回到 CF 页面 → 点击 "我已更新名称服务器"
→ 等待约 2 分钟完成注册
</code></pre></div></div>

<hr />

<h4 id="step-4配置自定义域名">Step 4：配置自定义域名</h4>

<p><strong>① 添加自定义域</strong></p>

<div class="language-plaintext highlighter-rouge"><div class="highlight"><pre class="highlight"><code>Workers 和 Pages / helloworld → 自定义域
→ 添加域名（如 zilong78.cc.cd）
→ 确认新 DNS 记录（此时暂停）
</code></pre></div></div>

<p><strong>② 添加 DNS 记录</strong></p>

<div class="language-plaintext highlighter-rouge"><div class="highlight"><pre class="highlight"><code>CF → 域 → 选择刚创建的域名
→ DNS 记录 → 添加记录
→ 填写上一步显示的 "确认新 DNS 记录" 信息
→ 保存
</code></pre></div></div>

<p><strong>③ 激活域名</strong></p>

<div class="language-plaintext highlighter-rouge"><div class="highlight"><pre class="highlight"><code>回到 "确认新 DNS 记录" 界面
→ 点击 "激活域"
→ 等待约 2 分钟完成
</code></pre></div></div>

<hr />

<h4 id="step-5更新节点伪装域名">Step 5：更新节点伪装域名</h4>

<p>通过自定义域名访问 edgetunnel 后台：</p>

<div class="language-plaintext highlighter-rouge"><div class="highlight"><pre class="highlight"><code>https://zilong78.cc.cd/login
</code></pre></div></div>

<p>更新 <strong>“节点伪装域名”</strong> 为你的自定义域名。</p>

<hr />

<h2 id="五自定义域名的好处">五、自定义域名的好处</h2>

<p>使用自定义域名替换默认的 <code class="language-plaintext highlighter-rouge">*.pages.dev</code> 域名，有以下优势：</p>

<table>
  <thead>
    <tr>
      <th>好处</th>
      <th>说明</th>
    </tr>
  </thead>
  <tbody>
    <tr>
      <td><strong>规避域名封锁</strong></td>
      <td><code class="language-plaintext highlighter-rouge">pages.dev</code> 域名在某些地区已被针对性干扰，自定义域名可有效规避</td>
    </tr>
    <tr>
      <td><strong>提升隐蔽性</strong></td>
      <td>自定义域名看起来像普通个人网站，降低被识别为代理服务的风险</td>
    </tr>
    <tr>
      <td><strong>防止关联封禁</strong></td>
      <td>即使单个域名被封，只需更换新域名即可恢复，不影响 Cloudflare 账户</td>
    </tr>
    <tr>
      <td><strong>灵活管理</strong></td>
      <td>可随时更换域名、切换 DNS 解析，拥有完全控制权</td>
    </tr>
    <tr>
      <td><strong>支持更多功能</strong></td>
      <td>自定义域名可配合 ECH 加密，进一步隐藏 SNI 信息</td>
    </tr>
  </tbody>
</table>

<blockquote>
  <p>💡 <strong>建议</strong>：即使是免费域名，也比默认的 <code class="language-plaintext highlighter-rouge">pages.dev</code> 域名更稳定可靠。</p>
</blockquote>

<hr />

<h2 id="参考链接">参考链接</h2>

<ul>
  <li><a href="https://dash.cloudflare.com/">Cloudflare 官网</a></li>
  <li><a href="https://github.com/cmliu/edgetunnel">edgetunnel 项目</a></li>
  <li><a href="https://www.dnshe.com/">dnshe 免费域名</a></li>
  <li><a href="https://bestcf.pages.dev/">bestcf 优选 IP</a></li>
</ul>]]></content><author><name></name></author><category term="Linux" /><category term="网络" /><category term="Cloudflare" /><category term="VPN" /><summary type="html"><![CDATA[使用 Cloudflare Pages 部署 edgetunnel 搭建代理节点的方案，是近年来非常流行的一种 Serverless（无服务器） 翻墙技术。 核心思想：利用 Cloudflare 遍布全球的边缘计算能力，将代理服务端代码运行在离你最近的 CDN 节点上。]]></summary></entry><entry><title type="html">架构设计文档</title><link href="/tutorial/2026/05/10/architecture-design.html" rel="alternate" type="text/html" title="架构设计文档" /><published>2026-05-10T00:00:00+00:00</published><updated>2026-05-10T00:00:00+00:00</updated><id>/tutorial/2026/05/10/architecture-design</id><content type="html" xml:base="/tutorial/2026/05/10/architecture-design.html"><![CDATA[<h2 id="概述">概述</h2>

<p>本文档介绍系统架构设计的核心概念和最佳实践。</p>

<h3 id="架构定义">架构定义</h3>

<p>软件架构是指软件系统的高层结构，包括：</p>

<ul>
  <li>组件及其关系</li>
  <li>系统设计原则</li>
  <li>技术选型依据</li>
</ul>

<h4 id="什么是好的架构">什么是好的架构</h4>

<p>好的架构应具备以下特征：</p>

<ol>
  <li><strong>可维护性</strong> - 易于理解和修改</li>
  <li><strong>可扩展性</strong> - 支持功能扩展</li>
  <li><strong>可测试性</strong> - 便于单元测试和集成测试</li>
  <li><strong>高性能</strong> - 满足性能要求</li>
</ol>

<h2 id="架构模式">架构模式</h2>

<h3 id="mvc-模式">MVC 模式</h3>

<p>MVC（Model-View-Controller）是最经典的架构模式：</p>

<p><img src="https://developer.mozilla.org/en-US/docs/Glossary/MVC/model-view-controller-light-blue.png" alt="MVC 架构图" /></p>

<pre><code class="language-mermaid">graph LR
    A[用户] --&gt; B[View 视图]
    B --&gt; C[Controller 控制器]
    C --&gt; D[Model 模型]
    D --&gt; C
    C --&gt; B
</code></pre>

<h4 id="mvc-的优点">MVC 的优点</h4>

<ul>
  <li>关注点分离</li>
  <li>代码复用</li>
  <li>并行开发</li>
</ul>

<h4 id="mvc-的缺点">MVC 的缺点</h4>

<ul>
  <li>复杂度增加</li>
  <li>学习曲线</li>
</ul>

<h3 id="微服务架构">微服务架构</h3>

<p>微服务架构将应用拆分为多个小型服务：</p>

<pre><code class="language-mermaid">graph TB
    subgraph 客户端
        A[Web App]
        B[Mobile App]
    end

    subgraph API 网关
        C[API Gateway]
    end

    subgraph 微服务
        D[用户服务]
        E[订单服务]
        F[支付服务]
        G[通知服务]
    end

    subgraph 数据层
        H[(用户DB)]
        I[(订单DB)]
        J[(支付DB)]
    end

    A --&gt; C
    B --&gt; C
    C --&gt; D
    C --&gt; E
    C --&gt; F
    D --&gt; H
    E --&gt; I
    F --&gt; J
    E --&gt; G
</code></pre>

<h4 id="服务拆分原则">服务拆分原则</h4>

<p>按业务能力拆分：</p>

<table>
  <thead>
    <tr>
      <th>服务</th>
      <th>职责</th>
      <th>技术栈</th>
    </tr>
  </thead>
  <tbody>
    <tr>
      <td>用户服务</td>
      <td>用户管理、认证</td>
      <td>Node.js</td>
    </tr>
    <tr>
      <td>订单服务</td>
      <td>订单处理</td>
      <td>Go</td>
    </tr>
    <tr>
      <td>支付服务</td>
      <td>支付流程</td>
      <td>Java</td>
    </tr>
  </tbody>
</table>

<h4 id="服务通信">服务通信</h4>

<pre><code class="language-mermaid">sequenceDiagram
    participant 用户
    participant API网关
    participant 订单服务
    participant 支付服务
    participant 通知服务

    用户-&gt;&gt;API网关: 提交订单
    API网关-&gt;&gt;订单服务: 创建订单
    订单服务-&gt;&gt;支付服务: 发起支付
    支付服务--&gt;&gt;订单服务: 支付结果
    订单服务-&gt;&gt;通知服务: 发送通知
    通知服务--&gt;&gt;用户: 推送消息
</code></pre>

<h2 id="数据架构">数据架构</h2>

<h3 id="数据库选型">数据库选型</h3>

<h4 id="关系型数据库">关系型数据库</h4>

<p>适用于事务处理场景：</p>

<p><img src="https://www.mysql.com/common/images/products/MySQL_Workbench_Visual_Design.png" alt="数据库关系图示例" /></p>

<pre><code class="language-mermaid">erDiagram
    USER ||--o{ ORDER : places
    USER {
        int id PK
        string name
        string email
    }
    ORDER ||--|{ ORDER_ITEM : contains
    ORDER {
        int id PK
        date created_at
        string status
    }
    ORDER_ITEM }|--|| PRODUCT : includes
    ORDER_ITEM {
        int id PK
        int quantity
        float price
    }
    PRODUCT {
        int id PK
        string name
        float price
    }
</code></pre>

<h4 id="nosql-数据库">NoSQL 数据库</h4>

<p>适用于大规模数据场景：</p>

<table>
  <thead>
    <tr>
      <th>类型</th>
      <th>代表</th>
      <th>适用场景</th>
    </tr>
  </thead>
  <tbody>
    <tr>
      <td>文档型</td>
      <td>MongoDB</td>
      <td>内容管理、日志</td>
    </tr>
    <tr>
      <td>键值型</td>
      <td>Redis</td>
      <td>缓存、会话</td>
    </tr>
    <tr>
      <td>图数据库</td>
      <td>Neo4j</td>
      <td>社交网络、推荐</td>
    </tr>
    <tr>
      <td>列存储</td>
      <td>Cassandra</td>
      <td>时序数据、IoT</td>
    </tr>
  </tbody>
</table>

<h3 id="缓存策略">缓存策略</h3>

<pre><code class="language-mermaid">graph LR
    A[请求] --&gt; B{缓存命中?}
    B --&gt;|是| C[返回缓存]
    B --&gt;|否| D[查询数据库]
    D --&gt; E[写入缓存]
    E --&gt; C
</code></pre>

<h4 id="缓存模式">缓存模式</h4>

<ol>
  <li><strong>Cache-Aside</strong>：应用层管理缓存</li>
  <li><strong>Read-Through</strong>：缓存层自动读取</li>
  <li><strong>Write-Through</strong>：同步写入缓存和数据库</li>
  <li><strong>Write-Behind</strong>：异步写入数据库</li>
</ol>

<h2 id="部署架构">部署架构</h2>

<h3 id="容器化部署">容器化部署</h3>

<p>使用 Docker 和 Kubernetes 进行容器编排：</p>

<pre><code class="language-mermaid">graph TB
    subgraph Kubernetes 集群
        subgraph Node 1
            P1[Pod 1]
            P2[Pod 2]
        end
        subgraph Node 2
            P3[Pod 3]
            P4[Pod 4]
        end
        LB[负载均衡器]
    end

    LB --&gt; P1
    LB --&gt; P2
    LB --&gt; P3
    LB --&gt; P4
</code></pre>

<h4 id="kubernetes-核心概念">Kubernetes 核心概念</h4>

<ul>
  <li><strong>Pod</strong>：最小部署单元</li>
  <li><strong>Service</strong>：服务发现和负载均衡</li>
  <li><strong>Deployment</strong>：声明式更新</li>
  <li><strong>ConfigMap</strong>：配置管理</li>
  <li><strong>Secret</strong>：敏感信息存储</li>
</ul>

<h3 id="高可用架构">高可用架构</h3>

<pre><code class="language-mermaid">graph TB
    subgraph 生产环境
        DNS[DNS 解析]
        CDN[CDN 节点]

        subgraph 应用层
            LB1[负载均衡]
            APP1[应用实例 1]
            APP2[应用实例 2]
            APP3[应用实例 3]
        end

        subgraph 数据层
            MASTER[(主数据库)]
            SLAVE1[(从数据库 1)]
            SLAVE2[(从数据库 2)]
        end
    end

    DNS --&gt; CDN
    CDN --&gt; LB1
    LB1 --&gt; APP1
    LB1 --&gt; APP2
    LB1 --&gt; APP3
    APP1 --&gt; MASTER
    APP2 --&gt; MASTER
    APP3 --&gt; MASTER
    MASTER --&gt; SLAVE1
    MASTER --&gt; SLAVE2
</code></pre>

<h2 id="安全架构">安全架构</h2>

<h3 id="认证授权流程">认证授权流程</h3>

<pre><code class="language-mermaid">sequenceDiagram
    participant Client
    participant Gateway
    participant Auth Service
    participant Resource Server

    Client-&gt;&gt;Gateway: 1. 请求资源
    Gateway-&gt;&gt;Gateway: 2. 验证 Token
    alt Token 无效
        Gateway-&gt;&gt;Client: 返回 401
    else Token 有效
        Gateway-&gt;&gt;Resource Server: 3. 转发请求
        Resource Server-&gt;&gt;Resource Server: 4. 检查权限
        alt 无权限
            Resource Server-&gt;&gt;Gateway: 返回 403
            Gateway-&gt;&gt;Client: 返回 403
        else 有权限
            Resource Server-&gt;&gt;Gateway: 5. 返回数据
            Gateway-&gt;&gt;Client: 返回数据
        end
    end
</code></pre>

<h3 id="安全最佳实践">安全最佳实践</h3>

<h4 id="api-安全">API 安全</h4>

<ul>
  <li>使用 HTTPS 加密传输</li>
  <li>实现 Rate Limiting</li>
  <li>输入验证和过滤</li>
  <li>JWT Token 管理</li>
</ul>

<h4 id="数据安全">数据安全</h4>

<ul>
  <li>敏感数据加密存储</li>
  <li>数据库访问控制</li>
  <li>审计日志记录</li>
</ul>

<h2 id="总结">总结</h2>

<p>良好的架构设计是系统成功的基础。选择合适的架构模式，结合业务需求进行权衡，才能构建出高质量的软件系统。</p>]]></content><author><name></name></author><category term="tutorial" /><summary type="html"><![CDATA[概述]]></summary></entry><entry><title type="html">博客搭建指南</title><link href="/tutorial/2026/05/10/blog-setup.html" rel="alternate" type="text/html" title="博客搭建指南" /><published>2026-05-10T00:00:00+00:00</published><updated>2026-05-10T00:00:00+00:00</updated><id>/tutorial/2026/05/10/blog-setup</id><content type="html" xml:base="/tutorial/2026/05/10/blog-setup.html"><![CDATA[<h2 id="环境要求">环境要求</h2>

<ul>
  <li>Ruby 2.5 或更高版本</li>
  <li>RubyGems</li>
  <li>GCC 和 Make</li>
</ul>

<h2 id="安装-jekyll">安装 Jekyll</h2>

<div class="language-bash highlighter-rouge"><div class="highlight"><pre class="highlight"><code>gem <span class="nb">install </span>jekyll bundler
jekyll new mysite
<span class="nb">cd </span>mysite
bundle <span class="nb">exec </span>jekyll serve
</code></pre></div></div>

<h2 id="项目目录结构">项目目录结构</h2>

<div class="language-plaintext highlighter-rouge"><div class="highlight"><pre class="highlight"><code>my-jekyll-site/
├── _config.yml          # 站点配置文件
├── _posts/              # 博客文章目录
├── _layouts/            # 布局模板目录
├── _includes/           # 可复用的页面片段
├── _sass/               # Sass 样式文件
├── _site/               # 生成的静态网站（自动生成）
├── assets/              # 静态资源（CSS、JS、图片等）
├── Gemfile              # Ruby 依赖管理
├── Gemfile.lock         # 依赖版本锁定
├── index.markdown       # 首页
└── about.markdown       # 关于页面
</code></pre></div></div>

<h2 id="核心文件详解">核心文件详解</h2>

<h3 id="_configyml">_config.yml</h3>

<p>Jekyll 最重要的配置文件，定义站点全局设置：</p>

<div class="language-yaml highlighter-rouge"><div class="highlight"><pre class="highlight"><code><span class="na">title</span><span class="pi">:</span> <span class="s">我的博客</span>
<span class="na">description</span><span class="pi">:</span> <span class="s">个人技术博客</span>
<span class="na">url</span><span class="pi">:</span> <span class="s2">"</span><span class="s">https://example.com"</span>
<span class="na">baseurl</span><span class="pi">:</span> <span class="s2">"</span><span class="s">/blog"</span>
<span class="na">timezone</span><span class="pi">:</span> <span class="s">Asia/Shanghai</span>
<span class="na">lang</span><span class="pi">:</span> <span class="s">zh-CN</span>
<span class="na">markdown</span><span class="pi">:</span> <span class="s">kramdown</span>
<span class="na">highlighter</span><span class="pi">:</span> <span class="s">rouge</span>

<span class="na">plugins</span><span class="pi">:</span>
  <span class="pi">-</span> <span class="s">jekyll-feed</span>
  <span class="pi">-</span> <span class="s">jekyll-seo-tag</span>

<span class="na">defaults</span><span class="pi">:</span>
  <span class="pi">-</span> <span class="na">scope</span><span class="pi">:</span>
      <span class="na">path</span><span class="pi">:</span> <span class="s2">"</span><span class="s">_posts"</span>
      <span class="na">type</span><span class="pi">:</span> <span class="s2">"</span><span class="s">posts"</span>
    <span class="na">values</span><span class="pi">:</span>
      <span class="na">layout</span><span class="pi">:</span> <span class="s2">"</span><span class="s">post"</span>
</code></pre></div></div>

<h3 id="_posts">_posts/</h3>

<p>存放博客文章，文件命名格式：<code class="language-plaintext highlighter-rouge">YYYY-MM-DD-title.markdown</code></p>

<p>每篇文章开头需要 <strong>Front Matter</strong>：</p>

<div class="language-yaml highlighter-rouge"><div class="highlight"><pre class="highlight"><code><span class="nn">---</span>
<span class="na">layout</span><span class="pi">:</span> <span class="s">post</span>
<span class="na">title</span><span class="pi">:</span> <span class="s2">"</span><span class="s">文章标题"</span>
<span class="na">date</span><span class="pi">:</span> <span class="s">2026-05-10</span>
<span class="na">categories</span><span class="pi">:</span> <span class="s">tutorial</span>
<span class="na">tags</span><span class="pi">:</span> <span class="pi">[</span><span class="nv">jekyll</span><span class="pi">,</span> <span class="nv">web</span><span class="pi">]</span>
<span class="nn">---</span>
</code></pre></div></div>

<h3 id="_layouts">_layouts/</h3>

<p>定义页面整体结构，可被其他页面继承：</p>

<div class="language-html highlighter-rouge"><div class="highlight"><pre class="highlight"><code><span class="c">&lt;!-- _layouts/default.html --&gt;</span>
<span class="cp">&lt;!DOCTYPE html&gt;</span>
<span class="nt">&lt;html</span> <span class="na">lang=</span><span class="s">"{{ page.lang | default: site.lang }}"</span><span class="nt">&gt;</span>
<span class="nt">&lt;head&gt;</span>
  <span class="nt">&lt;meta</span> <span class="na">charset=</span><span class="s">"utf-8"</span><span class="nt">&gt;</span>
  <span class="nt">&lt;title&gt;</span>{{ page.title }} | {{ site.title }}<span class="nt">&lt;/title&gt;</span>
  {% include head.html %}
<span class="nt">&lt;/head&gt;</span>
<span class="nt">&lt;body&gt;</span>
  {% include header.html %}
  <span class="nt">&lt;main&gt;</span>{{ content }}<span class="nt">&lt;/main&gt;</span>
  {% include footer.html %}
<span class="nt">&lt;/body&gt;</span>
<span class="nt">&lt;/html&gt;</span>
</code></pre></div></div>

<h3 id="_includes">_includes/</h3>

<p>存放可复用片段，通过 <code class="language-plaintext highlighter-rouge">{% include %}</code> 引入。</p>

<h3 id="assets">assets/</h3>

<p>存放 CSS、JavaScript、图片、字体等静态资源。</p>

<h2 id="liquid-模板语法">Liquid 模板语法</h2>

<h3 id="输出">输出</h3>

<div class="language-liquid highlighter-rouge"><div class="highlight"><pre class="highlight"><code><span class="p">{{</span><span class="w"> </span><span class="nv">page</span><span class="p">.</span><span class="nv">title</span><span class="w"> </span><span class="p">}}</span>
<span class="p">{{</span><span class="w"> </span><span class="nv">site</span><span class="p">.</span><span class="nv">title</span><span class="w"> </span><span class="p">}}</span>
<span class="p">{{</span><span class="w"> </span><span class="nv">content</span><span class="w"> </span><span class="p">}}</span>
</code></pre></div></div>

<h3 id="标签">标签</h3>

<div class="language-liquid highlighter-rouge"><div class="highlight"><pre class="highlight"><code><span class="p">{%</span><span class="w"> </span><span class="kr">if</span><span class="w"> </span><span class="nv">page</span><span class="p">.</span><span class="nv">title</span><span class="w"> </span><span class="p">%}</span>
  &lt;h1&gt;<span class="p">{{</span><span class="w"> </span><span class="nv">page</span><span class="p">.</span><span class="nv">title</span><span class="w"> </span><span class="p">}}</span>&lt;/h1&gt;
<span class="p">{%</span><span class="w"> </span><span class="kr">endif</span><span class="w"> </span><span class="p">%}</span>

<span class="p">{%</span><span class="w"> </span><span class="nt">for</span><span class="w"> </span><span class="nv">post</span><span class="w"> </span><span class="nt">in</span><span class="w"> </span><span class="nv">site.posts</span><span class="w"> </span><span class="p">%}</span>
  &lt;a href="<span class="p">{{</span><span class="w"> </span><span class="nv">post</span><span class="p">.</span><span class="nv">url</span><span class="w"> </span><span class="p">}}</span>"&gt;<span class="p">{{</span><span class="w"> </span><span class="nv">post</span><span class="p">.</span><span class="nv">title</span><span class="w"> </span><span class="p">}}</span>&lt;/a&gt;
<span class="p">{%</span><span class="w"> </span><span class="nt">endfor</span><span class="w"> </span><span class="p">%}</span>

<span class="p">{%</span><span class="w"> </span><span class="nt">assign</span><span class="w"> </span><span class="nv">my_var</span><span class="w"> </span><span class="o">=</span><span class="w"> </span><span class="s2">"Hello"</span><span class="w"> </span><span class="p">%}</span>
</code></pre></div></div>

<h3 id="过滤器">过滤器</h3>

<div class="language-liquid highlighter-rouge"><div class="highlight"><pre class="highlight"><code><span class="p">{{</span><span class="w"> </span><span class="nv">page</span><span class="p">.</span><span class="nv">date</span><span class="w"> </span><span class="p">|</span><span class="w"> </span><span class="nf">date</span><span class="p">:</span><span class="w"> </span><span class="s2">"%Y-%m-%d"</span><span class="w"> </span><span class="p">}}</span>
<span class="p">{{</span><span class="w"> </span><span class="nv">page</span><span class="p">.</span><span class="nv">title</span><span class="w"> </span><span class="p">|</span><span class="w"> </span><span class="nf">escape</span><span class="w"> </span><span class="p">}}</span>
<span class="p">{{</span><span class="w"> </span><span class="nv">page</span><span class="p">.</span><span class="nv">title</span><span class="w"> </span><span class="p">|</span><span class="w"> </span><span class="nf">truncate</span><span class="p">:</span><span class="w"> </span><span class="mi">20</span><span class="w"> </span><span class="p">}}</span>
<span class="p">{{</span><span class="w"> </span><span class="nv">site</span><span class="p">.</span><span class="nv">posts</span><span class="w"> </span><span class="p">|</span><span class="w"> </span><span class="nf">size</span><span class="w"> </span><span class="p">}}</span>
<span class="p">{{</span><span class="w"> </span><span class="s2">"assets/style.css"</span><span class="w"> </span><span class="p">|</span><span class="w"> </span><span class="nf">relative_url</span><span class="w"> </span><span class="p">}}</span>
</code></pre></div></div>

<h2 id="常用命令">常用命令</h2>

<div class="language-bash highlighter-rouge"><div class="highlight"><pre class="highlight"><code>jekyll new my-site                    <span class="c"># 创建新站点</span>
bundle <span class="nb">exec </span>jekyll serve              <span class="c"># 本地预览</span>
bundle <span class="nb">exec </span>jekyll serve <span class="nt">--port</span> 4000 <span class="nt">--host</span> 0.0.0.0  <span class="c"># 指定端口和主机</span>
jekyll build                          <span class="c"># 仅构建</span>
jekyll build <span class="nt">-d</span> /path/to/output       <span class="c"># 构建到指定目录</span>
jekyll clean                          <span class="c"># 清理生成文件</span>
</code></pre></div></div>

<h2 id="部署">部署</h2>

<h3 id="github-pages">GitHub Pages</h3>

<ol>
  <li>将代码推送到 GitHub</li>
  <li>在仓库设置中启用 GitHub Pages</li>
  <li>选择分支和目录</li>
</ol>

<p>自定义域名：在仓库根目录创建 <code class="language-plaintext highlighter-rouge">CNAME</code> 文件，写入域名。</p>

<h3 id="netlify">Netlify</h3>

<ol>
  <li>登录 Netlify，选择 Git 仓库</li>
  <li>构建设置：</li>
</ol>

<div class="language-plaintext highlighter-rouge"><div class="highlight"><pre class="highlight"><code>Build command: bundle exec jekyll build
Publish directory: _site
</code></pre></div></div>

<h3 id="vps-部署">VPS 部署</h3>

<ol>
  <li>生成静态文件：</li>
</ol>

<div class="language-bash highlighter-rouge"><div class="highlight"><pre class="highlight"><code><span class="nv">JEKYLL_ENV</span><span class="o">=</span>production bundle <span class="nb">exec </span>jekyll build
</code></pre></div></div>

<ol>
  <li>配置 Nginx：</li>
</ol>

<div class="language-nginx highlighter-rouge"><div class="highlight"><pre class="highlight"><code><span class="k">server</span> <span class="p">{</span>
    <span class="kn">listen</span> <span class="mi">80</span><span class="p">;</span>
    <span class="kn">server_name</span> <span class="s">example.com</span><span class="p">;</span>
    <span class="kn">root</span> <span class="n">/var/www/blog/_site</span><span class="p">;</span>
    <span class="kn">index</span> <span class="s">index.html</span><span class="p">;</span>
<span class="p">}</span>
</code></pre></div></div>

<ol>
  <li>自动化部署（Git hooks）：</li>
</ol>

<div class="language-bash highlighter-rouge"><div class="highlight"><pre class="highlight"><code><span class="c">#!/bin/bash</span>
git <span class="nt">--work-tree</span><span class="o">=</span>/var/www/blog <span class="nt">--git-dir</span><span class="o">=</span>/var/repo/blog.git checkout <span class="nt">-f</span>
<span class="nb">cd</span> /var/www/blog <span class="o">&amp;&amp;</span> bundle <span class="nb">exec </span>jekyll build
</code></pre></div></div>

<h3 id="cdn-加速">CDN 加速</h3>

<p>使用 Cloudflare 等 CDN 服务：</p>
<ol>
  <li>添加站点</li>
  <li>配置 DNS</li>
  <li>启用缓存规则</li>
</ol>]]></content><author><name></name></author><category term="tutorial" /><summary type="html"><![CDATA[环境要求]]></summary></entry></feed>